Category Archives: Budget Meals

Smoky Sweet Chipotle Shredded Beef

Standard

Over wine with a friend earlier this week, it was noticed and noted that I’ve been blogging in spurts when I blog at all. I try to live my life in a way that I don’t have to apologize, but I really am sorry I don’t make it around more often. I have a handful of posts drafted but haven’t taken pictures of the food, or I’ve taken pictures of the food and haven’t drafted recipes. Or, like this post, I didn’t make up the recipe at all, I once again tinkered with someone else’s. I’ve been reading and cooking a lot from other peoples places, and I feel like I’m just repeating their efforts (which makes me feel bad). But this one, well, I have to share. It was too damn good NOT to share.

So first, go visit this website. Andie’s blog is chock full of tasty goodness, and her writing is so honest and candid, I assure you, you will be hooked as fast as I was. She’s an inspiration, and her love of food is something to be reckoned with.

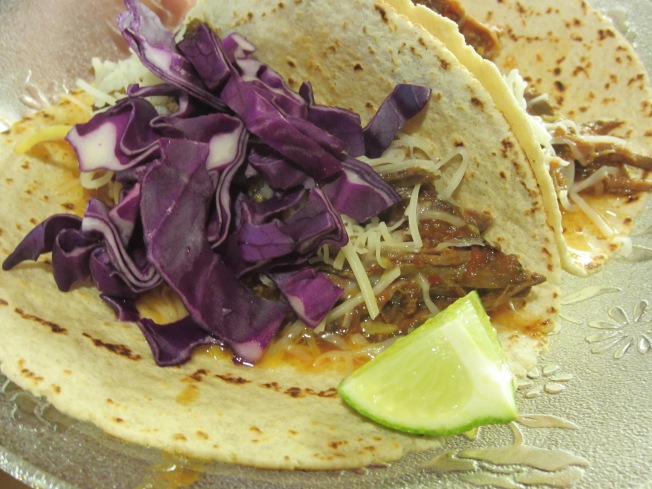
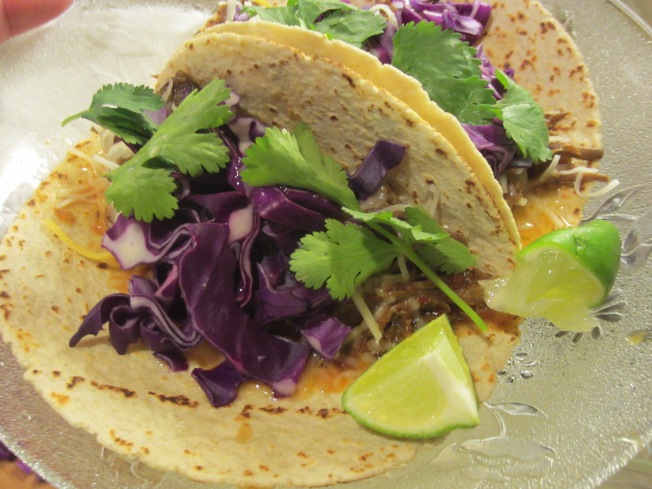
Second, make this shredded beef. I made it for Superbowl and we were going to make nachos out of it, but I lost steam and didn’t want to dirty another pan (and we were out of foil, so there went that idea), so we made tacos soft tacos with the sultry, silky shreds of beef. It made me feel a bit better that we sat around in our pajamas all day and didn’t have or attend a party. In fact, it made me a little glad that we didn’t do either – because we had enough meat left over for dinner another night and it was even better.

Andie’s recipe called for chicken which I’m planning to make soon, but I had a vision of shredded beef which was fueled by my visit to the clearance section of the meat counter at the store, which my dad affectionately refers to as the ‘used meat’ section. I had two pounds of boneless beef short ribs that needed to be used or frozen – and here’s what they became.

Shredded Beef Tacos


I actually like the picture below better because it’s prettier with the cilantro, but you couldn’t see the beef, so you get two pictures today.


IMG_1783

In making this beef I have found my One True Love of shredded beef –  replacing my other recipe, possibly for good. Try it out and see what you think. And take my advice, it tastes even better when eaten in your pajamas.

Smoky Sweet Chipotle Shredded Beef (In Taco Format)

1 T. canola oil
2 lbs. boneless beef short ribs
1 14 oz. can of diced tomatoes
1 canned chipotle chile in adobo
1 t. sauce from the chile can
1/2 of a yellow onion, chopped
3-4 cloves of garlic, roughly chopped
2 T. brown sugar
1/4 t. liquid smoke
Juice of 1 lime
1/4 c. fresh cilantro leaves
3-4 dashes Worcestershire sauce
Salt and Pepper

Optional, for serving:
Corn Tortillas
Shredded cheddar cheese
Shredded red cabbage
Lime wedges

Grab your crockpot (should be a 4-6 qt. crock) and get it ready for game time. In a large heavy skillet, heat the oil over medium-high heat until glistening. Lightly salt and pepper the ribs on all sides, and brown all sides, removing to the crockpot when they are caramelized to your liking.

In a food processor or blender, add all ingredients from tomatoes to Worcestershire, and blend until smooth. Pour contents of blender/processor over meat in crockpot, apply lid and cook at low heat for 8 hours. Shred meat with two forks and serve on corn tortillas with shredded cabbage, shredded cheese, lime wedges and cilantro leaves.
Sweet and Sour Chicken

Standard

Like many that love to cook, I have a vast array of cook books. It’s an incomplete collection, constantly growing and evolving. Some of my favorites have been bestowed upon me by my mom, who also has a vast collection of cookbooks and recipes.

A couple of  birthdays ago Mom gave me a couple of great cookbooks that she found at a local home collective, one of those being The Thousand Recipe Chinese Cookbook. I flicked through it a few times and dog eared some pages for future reference, but didn’t do a whole lot other than make some killer fried rice. Well, a few weeks ago I was paging through it while exploring the idea of an internet-search-free month of cooking (which I think I’m going to do, should be fun!). I un-dog eared a few pages and turned down a few different ones for things that are our ‘restaurant favorites’, now that we don’t have a Chinese resto within 15 miles of home (what the what? how’s a girl supposed to get a fix?!). We have a good one two towns south of here, but unless I’m already there I probably won’t make a special trip too often.

With the sadness of my dearly departed greasy Chinese joints (I used to live across the street from one of them and have fond memories of takeout and Sapporos and Sex and the City with a pal of mine), I decided to deploy some of the stuff I found in this book. The techniques that I learned in it made for superb fried rice, so what the hell, said I, let’s try some more.

One thing I love at most Chinese joints is really good Sweet and Sour Chicken. The bad stuff is bad to say the least, all that Red No. 5 and MSG and the 5 lbs of sugar and all. But when it’s done well, and is actually sweet AND sour it’s so, so good.

Granted, there’s still sugar in the sauce recipe but you can sub for honey if you have some, or brown sugar which is really tasty too. And spread out between 4 servings, it’s not that much sugar per capita.  The ingredients couldn’t be simpler and for me are things I always have on hand, so a batch of the sauce + whatever vegetables are in the crisper + a boneless skinless chicken breast + a pot of rice = dinner for 4 in less than no time. Less than the time it takes to order and pick up/have delivered your takeaway of choice. And I know there are a lot of recipes that claim this status, but this one means it.

Sweet and Sour Chicken

Sweet and Sour Chicken
Serves 4 as a single main, 6 if you throw in some frozen egg rolls or pot stickers, and makes great leftovers.

First, start a pot of rice, make a cup and a half (dry), using your favorite method. I like white rice with my Chinese food, and make mine on the stove top in a 2:1 water to rice ratio for 20 minutes, and this whole recipe comes together for me in about that time. But use your rice cooker, or boil and rinse method, whatever method you prefer. Start it early unless you’re using parboiled rice.

Sweet and Sour Sauce, adapted from the Thousand Recipe Chinese Cookbook

3/4 c. water
1/2 c. sugar, honey, or brown sugar
1/2 c. rice wine vinegar (or regular distilled white or apple cider, whatever you have)
1 T. soy sauce
2 T. cornstarch
3 T. water

Bring water to a boil in a small saucepan. Add in vinegar and sweetener of choice, and stir until sugar is dissolved. Stir together soy, cornstarch and remaining 3 T. water and add to vinegar mixture, stir until thickened. Set aside.

Chicken and Veggies

1 boneless skinless chicken breast, sliced into thin strips
1 red bell pepper, seeded and cut into 1″ pieces, AND/OR
1 yellow or green bell pepper, cut into 1″ pieces,
1/2 yellow onion, cut down the poles (top to root end), cut into thin half moon slices
1 1/2 c. pineapple chunks, preferably fresh but drained, canned chunks will work too
4 green onions, sliced into 1″ pieces
Canola oil, for frying (don’t use olive oil here, it doesn’t have a high enough smoke point and tastes icky when it gets this hot)

Cut up all vegetables and chicken and set aside. Heat a stainless steel or cast iron pan over high heat until SMOKING HOT. Add in 1 1/2 teaspoons of oil, swirl around the pan, and add in the chicken. Stir fry for 2-3 minutes, letting the outside of the chicken brown a bit and get crispy, and remove from pan. Add another teaspoon of oil, add in onions and stir fry for a minutes. Add in bell pepper of choice and pineapple, and stir fry for two minutes or until all vegetables/fruits are starting to char. Throw the chicken back in the pan, pour sauce over, add green onions and cover, reduce heat to medium low, and simmer for 2-3 minutes. Serve over hot rice.

Get Crazy Here

Standard

This, my friends, is a working girl’s breakfast. A breakfast of champions of the work place, lovingly prepared with my own two hands while speeding out the door in the morning.

If I’m smart and together, I’ll prepare it the night before and put it next to my purse so I don’t forget it. If I’m REALLY together I’ll make a few for the week and keep them in my desk. But the nice thing is that it can be thrown together so fast in the morning that if I forget the night before it only takes a second.

This is a humble instant oatmeal packet, in a homemade dress (or zip-top bag, if you so choose, but mine sounds more romantic). It means that I have a healthy, warm breakfast for a chilly fall morning without succumbing to the siren song of the vending machine or running out for an expensive snack or a cheap donut.

The idea here is a simple one: taking the instant oats packet and removing the extra crud that doesn’t need to be in it (I don’t care if my sugar clumps, I’d rather not eat the anti-clumping agent, thankyouverymuch). I eat a lot of overnight oats in the summer, but in the fall and winter I want something warm with my coffee. And you can’t beat the price: my little packs cost less than $0.20 each, and I reuse my ziptop baggies (recycling!).

The basics are this:

1/3 c. instant oats

A pinch of salt

1/2 to 1 T. brown sugar (or your choice of sweetener)

¼ t. cinnamon OR pumpkin pie spice OR apple pie spice

2 T. chopped dried apples, OR chopped dried apricots, OR raisins (optional)

You can swap out regular sugar or coconut sugar or turbinado sugar or whatever for the brown sugar. You can also leave it out and keep a small bottle of maple syrup or agave syrup in your drawer. I like the controlled aspect of the measured sugar here – if I drizzle syrup on top of my oatmeal the likelihood I’ll add more than I should is really high, and defeats the purpose of a healthy, whole grain breakfast. This is your choice, of course. If your willpower and drizzling skills are more honed than mine then this might be a good option.

The spices, too, are up to you. Clove, cinnamon, nutmeg, get crazy. You could do some chopped up dried apple with rosemary if you’d like, or dried apricots with some sage, whatever sounds tasty in your head. Raisins and clove? Orange zest and lavender? Get some, get crazy here. It’ll make your coworkers jealous, I tell you. The yummy smells wafting from your cube will drive them nuts.

For the Love of Leftovers

Standard

I read a book last week called An Everlasting Meal by Tamar Adler. If you haven’t read this book, run out and get it, it’s a game-changer. I’ve always considered myself to be a  thrifty and frugal cook, but this book brought me up to a whole new level. I mean, I make chicken stock from my clean-picked birds, but hadn’t thought about saving the skins and ends from onions, scraps and tops of carrots and ends and tops of celery to make my stock with, I always start with whole vegetables that I go out and buy. I’m familiar with the adage Waste Not Want Not, but this, this was different. Her creative use of what’s left and what most people think of as trash is outrageously amazing. We’re talking about saving artichoke cooking water to be the basis of soup, here. Stuff like this was head-slapping realization for me. Why not? As such, I’m rereading the book this week, a bit more slowly, and taking notes. In a time when we should all be a bit more cautious with our spending, I urge you to read her book.

And beyond her uses of these cast-away items, her description of food, how it should taste, her use of salt, her use of olive oil, her encouragement of nibbling and savoring, was, in a word, beautiful. It spoke to my food obsessed soul. Yes.

In reading this book, it’s changed my view of leftovers yet again. I’m pretty good about not throwing away food, but will admit my guilt about the things that compost in the vegetable bins (whoever named them the Crisper Drawers was either a liar or horribly misinformed). Now, though, with some of the new things I learned in this book, I’m armed with some new game plans for lifeless lettuce and dying cucumbers. Not that dinner last night contained either of these things. It did make use of some rather morose looking bell peppers, though.

The weather took a turn toward cooler this week, which I’ll be honest with you is fine by me. After last week’s 100+ degree blitz for more than a couple of days, I’ll take some overcast drizzly mornings, 70 degree afternoons, and cool evenings. Last night I almost wanted to put another blanket on the bed, it was so chilly! (Un)Luckily for me, the cat decided he needed to sleep on top of my feet all night long (no matter where I put them), so I had toasty toes without getting out a blanket. He’s such a needy little beast sometimes.

And with the turn in the weather, my appetite took a turn toward comfort. Last week I could hardly bear to turn on the stove, this week I made Chicken and Rice Soup for dinner on Monday. My mom thought I was crazy but it just sounded so good. I got myself a double-coupon deep discount organic chicken on Saturday (that cost me less than $5 for a 6.5 pound bird), and though I didn’t need one I couldn’t pass up the price. A whole chicken is a poor housewife’s savior if she’s a crafty girl, and can be made into not just one but upward of 4 dinners. Warm chicken bistro salads one night, another night he was Chicken and Rice Soup, last night he was pasta, and today he’ll be chicken stock to re-up my freezer coffers. Chicken stock means polenta, quick soup, and risotto base. I blast through a ton of it any given week and making it is a skill that I’m happy to have.

For those of you freaking out that it’s Friday and that chicken was just used up last night, well, calm down. The mystical powers of refrigeration and high heat made it perfectly safe to eat. I assure you.

And oh, that pasta. Sometimes a girl has to dispatch with the healthy and just have creamy pasta for dinner. On the whole the husband and I eat pretty healthy, but you have to give in every now and again. This pasta jogs somewhere in between. And for those of you who don’t think they like leftovers, I promise you, this pasta will change your tune. You see, the thing about leftovers is that they just need a little finesse to turn them into something else. This isn’t Saturday’s Chicken, this is Thursday’s Pasta.

Chicken Bacon Ranch Pasta
Serves 8 (easily divides in half)

1 lb. short pasta (penne, spirals, something that will hold the sauce in. I used gluten free brown rice penne.)
3 strips of thick cut bacon
1 t. butter
2 c. chopped bell pepper, whatever colors your family likes (no bell pepper? Use whatever is about to die in your ‘crisper’ drawer)
1 c. chopped onion
3 c. cooked, shredded chicken (we used white and dark meat, the choice is yours)
½ c. low fat buttermilk
½ c. sour cream or mayonnaise (use light or fat free if you’d like, I used good ol’ full fat mayonnaise because it’s what I had)
½ t. dry mustard
½ t. dried oregano
½ t. dried basil
¾ t. dried dill
¼ t. salt
¼ t. black pepper
1 garlic clove, minced
Salt and pepper, to taste
1 c. shredded sharp cheddar or gruyere cheese
½ c. minced green onions
½ c. bread crumbs

In a large bowl, combine buttermilk through minced garlic, mixing well to combine, and set aside. Boil pasta according to package directions, drain and set aside. Preheat the oven to 400*F.

In a medium skillet, cook bacon until very crisp, drain and crumble into bits. Drain all but 1 t. of the bacon drippings, add in butter. Sautee’ peppers and onions in skillet over medium heat until cooked and onions are translucent, about 4-5 minutes. Lightly season with salt and pepper. Add in chicken and warm through.

Add pasta, chicken mixture, and bacon to the buttermilk mixture, stir together well to combine. Taste and adjust seasoning with salt and pepper, if desired. Pour all in to a 13×9” oven safe baking dish (if you’re halving the recipe, put it in your favorite 2 quart baking dish). Top with cheese, green onions, and bread crumbs. Bake uncovered at 400*F for 20-25 minutes until cheese is melted and dish is heated through. To crisp breadcrumbs, run the dish under the broiler for 2-3 minutes, if desired.

Breakfast is Served

Standard

Good Morning, and Happy Friday to you all! Are you ready for the weekend? Do you have any big plans? I think we’re just going to lay low and relax again ~ most everyone we  know is busy, so we are going to enjoy the fact that we aren’t!

And what better way to fuel a weekend than to start with breakfast. We aren’t big Every Day Breakfast people around our house; in fact the only one of us that eats his breakfast almost every day is the cat, and lately even he has been off of the idea. Nick and I are coffee with coffee people in the morning, rarely taking in more than that. One of us might muster the gumption to fry an egg every now and again, but only on the weekends. It’s such a bad habit to not eat breakfast, but neither of us wakes up hungry. He goes to work, I go about my day, and the next thing we know, lunch is upon us and our tummies are rumbling.

I’m trying to get myself to eat breakfast, as I have found that I’m less hungry later in the day when I do, thus preventing me from mowing an extra helping of dinner down. I could just eat yogurt and berries and granola, or even just yogurt and berries, but I get tired of it. Even with the endless combination of fruits and nuts and whathaveyou that you can stir in to yogurt, it just gets old. I do eat toast every now and again, but meh. We don’t have a real toaster and sometimes I don’t want to turn on the oven just to toast a slice of bread (note to self: buy toaster). And I do love oatmeal, but with the weather as hot as it has been, the last thing I want to start my day with is something hot.

Lately, I’ve taken the Swiss approach and made my oatmeal the night before (the Swiss call this Museli). There’s no cooking, and the ingredients you can add are endless. Thinking beyond the canister I searched around the internet and found this blog, which is written by the cutest little gal and is chock full of yummy vegetarian things. I’m nto a vegetarian, but for breakfast, it’s something I can get behind.

One of her overnight oats recipes floored me. Chocolate. Oatmeal. No way. For breakfast? What could me more indulgent for breakfast than ChOcOlAtE?! I was hooked. I was also down a couple of ingredients for her version, and wanted a couple bites more than what hers prepared (as I am a bigger girl, I wanted a bigger brekkie. Can you blame me?) And so, Raspberry Chocolate Smash was born.

You can make a couple of these at a time, so you have breakfast for a few days made in one short assembly line. I love my vintage Pyrex fridge dishes for this application, but  if I didn’t have them this would SO be one of those Food In Jars projects. And who doesn’t love eating things out of mason jars these days? It’s almost as fun as food on a stick.

Raspberry Chocolate Smash
Makes 1, multiply by the number of jars you’re assembling

1/3 c. old fashioned oats (you can use Instant, too, I haven’t found a huge difference in texture, but the old fashioned are more hearty. Don’t use steel cut!)
1/3 c. milk (what ever fat level you’re comfortable with, or almond, soy, coconut, etc.)
1 1/2 t. unsweetened cocoa powder
1 t. chia seeds (optional, I had some laying around so I tossed them in. They add great mouth feel.)
1/2 t. vanilla extract
1/2 t. maple syrup or honey
1/4 t. cinnamon
6-8 raspberries

Combine oats through cinnamon, stirring until well mixed. Gently stir in raspberries. Cover and refrigerate overnight. Stir just before eating.

They Say it’s Your Birthday…

Standard

I had the great pleasure of making dinner for my dear Dad for his birthday this year. I realized the other day that I hadn’t had my mom and dad over together, and for dinner, since we moved. For shame. What better day to have them over than on Dad’s birthday, am I right? (I know some of you are saying Father’s Day but, it being his day and all, he decided he wanted to grill ribs and oysters in his own back yard. I can’t say I blame him, my parents’ back yard looks like it fell right outta Sunset magazine, no fooling). And what a birthday feast I planned for him!

Le Menu

To Start
Fig and Goat Cheese Crostini with Balsamic Syrup
Piquillo Peppers filled with Mozzarella and Basil

For Dinner
Zucchini Galettes with Fresh Ricotta and Lemon
Oven Roasted Salmon on a bed of Spring Greens

For Dessert
Chocolate Cake filled with Strawberries,
Homemade Strawberry Jam and Fresh Strawberry Cream Cheese Frosting

Say it with me, YUM. I know, it’s kind of a lot. But Dad and I have many things in common, including the feeling that going out to dinner is overrated a lot of the time, because, well, my mom and I cook like this. I thought about taking him out for dinner but it just means so much more to have someone prepare a really beautiful meal for you. The best part about this is I had the time to do it all. Not that any one part of it (well, except for maybe the cake) was cumbersome or labor intensive, it just takes time that I wouldn’t ordinarily have on a weekday and this year I did. And I’m learning in my old age that the best gift you can give anyone, ever, is the gift of your time.

I’m proud to say that I made my own ricotta for the galettes (and for those of you who know me well, I made my own pie crust too, which I rarely do). Ricotta from the grocery is mealy at best, and tastes like grade school paste at worst (and don’t even get me started on the fat free amalgamations out there, holy crow they are so gross). Unless, of course, you buy one of the artisan containers, and those are so pricey. But if you have ever tasted the fresh ricotta, you know that the silky mouth feel and milkiness are so superior to the grade school paste that you can never go back.

Making your own ricotta is honestly easy as 1-2-3, and you can make it with wonderful, organic local milk and no weird preservatives or stabilizers for a fraction of what the already-made cheese would cost you at upscale grocer in town. A 1 lb. container of the really great, really fresh ricotta at my favorite cheese counter is upward of $6. How much does a half gallon of milk cost? Even the local organic moo? In my store, less than $3.50. Be sure that you are grabbing milk that is NOT ultra pasteurized, you want some of those little bacteria that hang around in regular old milk. It should tell you right on the front of the carton if it’s ultra pasteurized or not.

Fresh Ricotta
Makes about two cups

1/2 gallon of whole milk (Yes, whole, 2% doesn’t have enough fat to get the job done.)
6 T. freshly squeezed lemon juice
1 t. sea salt

Heat the milk in a large pot (or in your microwave like I did) until it reaches 180*F. DON’T BOIL IT, we don’t want it scalded. Remove milk from the heat, stir in the acid of your choice plus the salt, and stir gently just once or twice. Let the milk hang out for 5 minutes; you will see the curds separating from the whey immediately (see picture above).

Line a colander with cheese cloth (or in my case, a clean flour sack towel) with a pan underneath to catch the whey. Pour the warm curds into the cloth-lined colander and let the cheese strain, for about an hour for looser cheese or up to two hours if you want one that’s a bit more firm, closer to cream cheese. (If your cheese strained for longer than you wanted it to, stir back in a bit of the whey that you captured in the pan. Or just add some olive oil!).

Use the cheese right away or store in an airtight container in the fridge until ready to use. Pat yourself on the back for being the ultimate homemaker, making your own cheese and saving yourself $2.50.

Twofer Two: Pork Fried Rice

Standard

The second meal I made from that pork tenderloin and rice that we had on Sunday was Pork Fried Rice. Fried rice was a staple in my house, alongside egg burritos, when I was a poor hotel front desk employee. I made many meals for myself and friends out of a handful of this-and-that tossed in a pan.

Get crazy with your chopped vegetables. This dinner is a good Veg Drawer Cleaner Outer, use up that last sad stalk of celery, that wedge of bell pepper, hell you can even throw in lettuce if you’re not averse to warm greens. Seriously, use whatever here.

Fried rice will literally cook in less than 7 minutes, so make sure your ingredients are measured and your food is all chopped up before you turn your pan on. The most cumbersome part of making something like this is dicing up all of the components, making this is a good task to share with a spouse or kitchen partner.

Pork Fried Rice
Makes enough for 4-6 servings

1 cup (more or less) leftover pork tenderloin
1 1/2 cups diced vegetables (I almost always use napa cabbage, and whatever else is in the fridge: bell peppers, scallions, carrot, zucchini)
1/2 thinly sliced onion
3 eggs, cracked into a cup and gently beaten
4 cups cold cooked rice (we used brown, but white will work too)
Leftover sauce from Pork Tenderloin
-OR-
A mixture of 3 T. Soy Sauce or Tamari, 1 T. sherry, and 1/2 t. sugar or honey
4-5 T. canola oil (don’t use olive oil here, you want something with a higher smoke point)

Chop up and measure out all ingredients before heating your pan, as cooking goes QUICK. Break up any chunks in your refrigerated rice with tongs or a wooden spoon.

Get out your biggest, baddest, heaviest cast iron or non-stick skillet (I use my 12″ calphalon here and it’s BARELY big enough, you really want to be able to toss your food around). Heat your pan over high heat for a minute or two, and pour in a tablespoon-ish of oil. Swirl it around the pan and let it heat until shimmering and lightly smoking. Turn on your exhaust fan and prepare for battle.

Add onion to the pan and fry quickly (literally about a minute) until starting to char. Add in your mixed vegetable medley and fry for a couple minutes until also charring. Remove all vegetables from pan to a large heat-proof bowl.

Add more oil to the pan (2-3 tablespoons). When smokin’ hot,  dump the rice into the pan and quickly fry, turning with a folding motion to get all of the rice in contact with the pan bottom and rotating it around. It takes a couple of minutes, don’t rush it.

Pour the beaten eggs over the hot rice and fold in gently (I like getting egg chunks in my rice, stir more vigorously to break them down if you want) until egg is barely cooked. Pour the leftover pork sauce or soy sauce mixture over the rice and egg and stir to mix.

Add vegetable/onion medley back to the pan and quickly toss to reheat all of it.

Serve in bowls with additional soy sauce, chili oil and/or sesame oil on the side.

Twofer: Honey-Gingered Pork Tenderloin

Standard

It can be cumbersome coming up with a dinner idea some nights. I have a handful of ‘standards’ that I can whip up in a moment’s notice but there are evenings when even that fails me because I just don’t want to eat it. It’s hard for me to put my heart into something that I know I don’t want to eat, even if it is one of my favorites. These uninspired nights generally end up being bacon and egg nights, or even (eeek) ramen and toast nights. Don’t judge. Having the foresight to think up two dinners and only have to do the real cooking once is a life-saver. Most of those types of dinners around our house come from the Sunday Night Chicken Roast, but who’s roasting a bird when it’s a million degrees outside? Certainly not I, even with air conditioning. And to be honest, I’m kind of chickened out these days, we eat a lot of it.

Pork tenderloins aren’t something that make regular appearances at our house. The only pork persuasion  items that I generally buy with any sort of frequency are bacon and Italian sausage, and the occasional pork shoulder for a dinner party or carnitas. Sometimes I’ll buy a ham when they’re on sale around the holidays that warrant their immediate consumption. I sometimes get some fat pork chops when I’m blue and need gravy. I grabbed a couple tenderloins and froze them last week but only because they were fire-sale priced and really make for a fast dinner, as they cook in no time flat.

I managed to come up with a new twofer this week, which I’m a bit proud of. Night 1 was this Honey-Gingered pork tenderloin, with brown rice and foil-roasted green beans.  To make this a twofer, save about 1/4 of the pork tenderloin, and make double the amount of rice that you will need for dinner and save it for Night 2 Pork Fried Rice later in the week when you don’t feel like thinking up dinner (recipe to follow later this week).

I only made one pork tenderloin and used the entire amount of marinade. If you’re making two tenderloins like the recipe calls for, double the marinade so you have enough to boil down for sauce for dinner later in the week. The marinade was probably one of the best I’ve ever had, I didn’t even get to marinate it the entire time, either. I can only imagine how good it would have been if I pulled my life together and made it the night before like the recipe said! Also, for those who don’t eat pork, this would be amazing with turkey ‘tenderloins’, turkey breast or chicken breast.

Honey-Gingered Pork Tenderloins
Adapted from Gourmet magazine

Two 3/4-pound pork tenderloins (I only used one)
1/4 cup honey
1/4 cup soy sauce (or tamari)
1/4 cup oyster sauce
2 tablespoons packed brown sugar
1 tablespoon plus 1 teaspoon minced peeled fresh gingerroot
1 tablespoon minced garlic
1 tablespoon ketchup
1/4 teaspoon onion powder
1/4 teaspoon cayenne
1/4 teaspoon cinnamon

Pat pork dry and arrange in a shallow dish. In a bowl whisk together all remaining ingredients and pour marinade over pork. Turn pork to coat well. Chill pork, covered, turning it once or twice, at least 8 hours and up to 1 day.

Prepare grill.

Remove pork from marinade, reserving marinade, and arrange on a lightly oiled rack set 5 to 6 inches over glowing coals (or over medium high heat on a gas grill). Grill pork, basting with reserved marinade and turning it every 5 minutes, 15 minutes total. Continue to cook pork, turning it every 5 minutes, until a thermometer diagonally inserted 2 inches into center of tenderloin registers 155°F., about 10 minutes more. Let pork stand 5 minutes before thinly slicing.

For Sauce: Save the left over marinade! Pour into a saucepan, add 1/2 c. water, bring up to a boil and reduce the whole mixture by half. Drizzle a little over the sliced pork for tonight’s dinner, and save the rest for dinner later in the week.

Next up: Pork Fried Rice

Putting it together

Standard

I was on my feet all day working a wine event and realized I didn’t have a dinner plan. The horror. Being food obsessed, this isn’t something that gets past me very often. I make my meal plans for at least 4-5 days at a span so I always have something yummy in the wings waiting to be prepared. That day, though, my mind was melting in the heat and my best-laid plans were all but gone. This, roughly translated, means that nothing that I had on my plan sounded good.

When I hopped in my car at the end of the day and tried to put something together that wasn’t a vat of frozen yogurt consumed in an ice cold shower. Something that didn’t require standing up too long since my dogs were barking, and something that was tasty and cool and refreshing, that didn’t require an additional trip to the store. Once I had slipped in to the sublime coldness of my air conditioned car I wasn’t getting back out until I was home sweet home.

I first made this shrimp cocktail many years back on an equally mind-melting night. I packed up my picnic hamper with cold beer and fresh tortilla chips and went over to Nick’s house, where he had a pool and air conditioning (I had neither of these things). We sat on the deck in the breeze and stuffed ourselves with chips and shrimp cocktail and ice cold beer, and declared this dish a withering-heat winner.

Food Purists take note: yes, I do know that this isn’t traditional ceviche. For those who are unsure what ceviche is, it’s fish and seafood cooked only with citrus juices, generally lime, whose acids ‘cook’ the fish. But Rick Bayless knows his Mexican cuisine, and I trust his naming of this concoction. It’s very similar to the coctail de camarones you get in a Mexican restaurant. And yes, it calls for ketchup. Think of it in this application as a pre-seasoned tomato sauce base (and don’t even try to use tomato sauce as a substitute, it won’t taste the same and you’ll be severely disappointed. You’ve been warned).

One could go about the shrimp preparation a number of different ways. The suggested poaching in lime water makes for succulent, soft shrimp, but in a pinch I’ve poached them with out the lime water when I didn’t have enough for the completed dish. I’ve also made this with defrosted, precooked, previously frozen deveined shrimp and no one was any the wiser. It’s a great dish to take to a barbecue or potluck, as well as for company. It’s surprisingly filling, too. So on a hot night when you have some folks over, a margarita or two or some icy cold Mexican beer and a great big communal bowl of this is a festive alternative to a sit down dinner. Make it ahead and stir in the avocado just before serving (it gets cloudy otherwise), serve some grill-roasted corn on the cob with chile powder and lime, and it meets or beats every taqueria whose coctail de camarones you’ve dared to try. Give it a whirl, you won’t be disappointed.

Ceviche de Camaron: Shrimp Ceviche “Cocktail”
by Rick Bayless, via Epicurious

1/2 cup plus 2 tablespoons fresh lime juice
1 generous pound unpeeled smallish shrimp (I prefer the ones that are 41/50 count to a pound)
1/2 medium white onion, chopped into 1/4 inch pieces
1/3 cup chopped fresh cilantro, plus several sprigs for garnish
1/2 cup ketchup
1 to 2 tablespoons vinegary Mexican bottled hot sauce (such as Tamazula, Valentina or Búfalo, the latter being on the sweet side)
About 2 tablespoons olive oil, preferably extra-virgin (optional, but recommended to smooth out sharpness)
1 cup diced peeled cucumber or jícama (or 1/2 cup of each)
1 small ripe avocado, peeled, pitted and cubed
Salt
Several lime slices for garnish
Tostadas or tortilla chips, store-bought or homemade or saltine crackers for serving

1. Cooking and Marinating the Shrimp.
Bring 1 quart salted water to a boil and add 2 tablespoons of the lime juice. Scoop in the shrimp, cover and let the water return to the boil. Immediately remove from the heat, set the lid askew and pour off all the liquid. Replace the cover and let the shrimp steam off the heat for 10 minutes. Spread out the shrimp in a large glass or stainless steel bowl to cool completely. Peel and devein the shrimp if you wish: One by one lay the shrimp on your work surface, make a shallow incision down the back and scrape out the (usually) dark intestinal tract. Toss the shrimp with the remaining 1/2 lime juice, cover and refrigerate for about an hour. Spare yourselves, kids – get the shrimp that are already peeled and deveined. No one will know but you.

2. The flavorings.
In a small strainer, rinse the onion under cold water, then shake off the excess liquid. Add to the shrimp bowl along with the cilantro, ketchup, hot sauce, optional olive oil, cucumber and/or jícama and avocado. Taste and season with salt, usually about 1/2 teaspoon. Cover and refrigerate if not serving immediately.

3. Serving the ceviche.
Spoon the ceviche into sundae glasses, martini glasses, or small bowls: garnish with sprigs of cilantro and slices of lime. Serve with tostadas, tortilla chips or saltines to enjoy alongside. We dispense with the additional dishes and eat it out of the big bowl like savages. You may do as you wish, it IS lovely in a tall glass with a couple of shrimp hanging off the side, with the extra lime slices and cilantro sprigs.

Working Ahead:
The ceviche is best made the day it is served. The flavorings can be added to the shrimp a few hours in advance.

Way Back

Standard

Does anyone else out there remember pudding pops? On a recent trip to the grocery store I had a sudden want for them (I’ve been on a big frozen dessert kick lately with the uptick in the mercury) and in wandering the frozen food aisle was bereft to find they didn’t have any. And when I asked the kid who was stocking the cases if they still carried them, he questioned what they were, and asked if I maybe meant fudgesicles? Obviously they’ve been gone of the shelves longer than I thought, and I suddenly felt like I was eleventy-billion years old. I wanted to ask this whippersnapper if he knew what a VHS tape was and if he’e ever heard of a man named Bill Cosby, but resisted the urge to completely embarrass myself and wheeled my cart away in shame.

After traveling through the meat counter, the deli and the produce department, I had an idea. Looking at the strawberries in my hand, I decided to try to make myself some pudding pops. Even if they weren’t the same silky consistency, they would probably be pretty damn good. I wandered to the baking aisle.

I never realized there were so  many flavors of pudding, I’m such a chocolate pudding kid that I never even thought that they made flavors other than that and vanilla. There was butterscotch, caramel, pistachio (in a very fetching shade of mint green, might I add), chocolate, milk chocolate, Oreo cookie and cream, vanilla, french vanilla, banana, and the one I settled on: cheesecake. I came up with a cold dozen different combinations of pudding and adjuncts with which to make pops; I told myself I was pudding-blind and to put back the butterscotch, with a silent promise to make the banana-butterscotch pops dancing in my head the next time if the first batch came out edible.

Back at the ranch, I rinsed and dried some strawberries and whizzed together my pudding and milk. I stirred in a little bit of vanilla extract to give it a more homemade flavor, though who was I kidding; I bought the fat-free sugar-free mix and there’s no real way the pudding was going to taste homemade. I know I crow a lot about only eating things that a 5 year old can pronounce and that processed food is the downfall of society. But sometimes a girl needs a mouthful of junk. And fewer calories and fat. And besides, I added strawberries, that had to health it up at least a little bit.

With the strawberries sliced and gently folded into my pudding, I filled up the ice pop molds, which was not as easy as it sounded. I left the strawberries in big chunks and my molds are the skinny, flat variety, so it took some finagling. Next time I’m going to mix up the pudding in a zip top bag and cut off a corner of it to faux-pipe the mixture into the molds. Necessity is the mother of invention, and I need to keep more of the pudding off the counter next time. I’m sure Bill Cosby never had this problem way back when.

If you venture out into making these, be sure to give the molds a couple of good smacks on the counter after filling, to force the air bubbles to the top. Don’t worry about splashing, the pudding is fairly set up. Total cost for 10 pops was less than $2, and each pop is less than 40 calories according to some quick math. Wallet and waistline friendly!

Strawberry Cheesecake Pudding Pops
Makes 10 in my ice pop molds, will vary with mold size

1 package instant Cheesecake flavored pudding (I used sugar-free fat-free)
2 cups cold milk
1 t. vanilla extract
1 cup sliced strawberries
1 graham cracker, crushed

In a mixing bowl (or a zip top plastic bag), combine the milk, pudding and vanilla, and prepare according to package directions. Gently fold in the strawberries, and fill clean ice pop molds with the mixture, leaving a bit of room at the top for expansion (less than 1/4″ headspace). Sprinkle with graham cracker crumbs, insert popsicle sticks, and freeze until firm (1-2 hours).