Category Archives: Thinking Ahead

Smoky Sweet Chipotle Shredded Beef

Standard

Over wine with a friend earlier this week, it was noticed and noted that I’ve been blogging in spurts when I blog at all. I try to live my life in a way that I don’t have to apologize, but I really am sorry I don’t make it around more often. I have a handful of posts drafted but haven’t taken pictures of the food, or I’ve taken pictures of the food and haven’t drafted recipes. Or, like this post, I didn’t make up the recipe at all, I once again tinkered with someone else’s. I’ve been reading and cooking a lot from other peoples places, and I feel like I’m just repeating their efforts (which makes me feel bad). But this one, well, I have to share. It was too damn good NOT to share.

So first, go visit this website. Andie’s blog is chock full of tasty goodness, and her writing is so honest and candid, I assure you, you will be hooked as fast as I was. She’s an inspiration, and her love of food is something to be reckoned with.

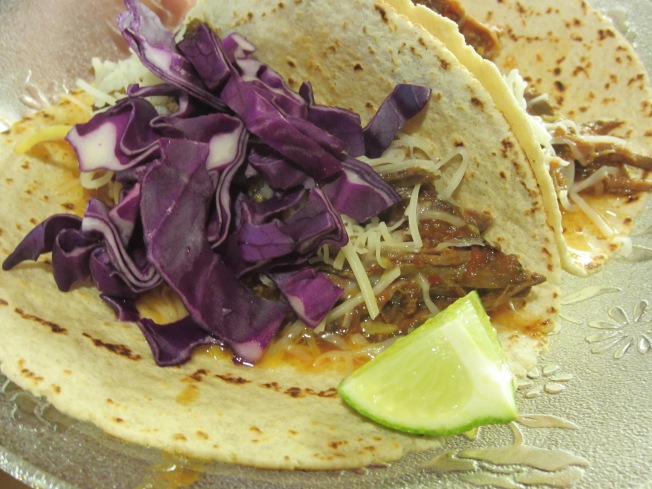
Second, make this shredded beef. I made it for Superbowl and we were going to make nachos out of it, but I lost steam and didn’t want to dirty another pan (and we were out of foil, so there went that idea), so we made tacos soft tacos with the sultry, silky shreds of beef. It made me feel a bit better that we sat around in our pajamas all day and didn’t have or attend a party. In fact, it made me a little glad that we didn’t do either – because we had enough meat left over for dinner another night and it was even better.

Andie’s recipe called for chicken which I’m planning to make soon, but I had a vision of shredded beef which was fueled by my visit to the clearance section of the meat counter at the store, which my dad affectionately refers to as the ‘used meat’ section. I had two pounds of boneless beef short ribs that needed to be used or frozen – and here’s what they became.

Shredded Beef Tacos


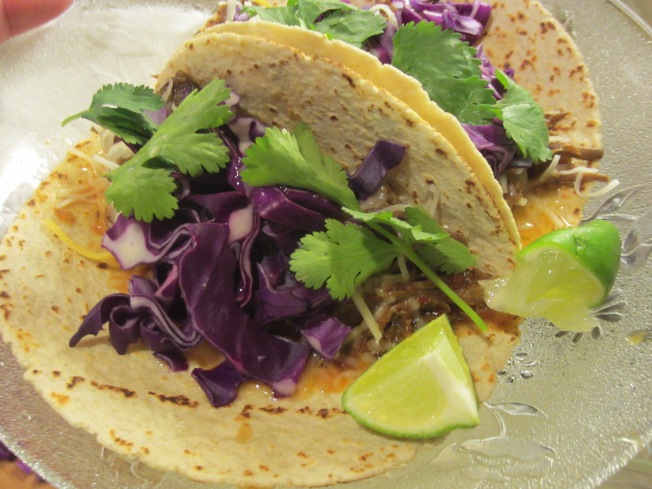
I actually like the picture below better because it’s prettier with the cilantro, but you couldn’t see the beef, so you get two pictures today.


IMG_1783

In making this beef I have found my One True Love of shredded beef –  replacing my other recipe, possibly for good. Try it out and see what you think. And take my advice, it tastes even better when eaten in your pajamas.

Smoky Sweet Chipotle Shredded Beef (In Taco Format)

1 T. canola oil
2 lbs. boneless beef short ribs
1 14 oz. can of diced tomatoes
1 canned chipotle chile in adobo
1 t. sauce from the chile can
1/2 of a yellow onion, chopped
3-4 cloves of garlic, roughly chopped
2 T. brown sugar
1/4 t. liquid smoke
Juice of 1 lime
1/4 c. fresh cilantro leaves
3-4 dashes Worcestershire sauce
Salt and Pepper

Optional, for serving:
Corn Tortillas
Shredded cheddar cheese
Shredded red cabbage
Lime wedges

Grab your crockpot (should be a 4-6 qt. crock) and get it ready for game time. In a large heavy skillet, heat the oil over medium-high heat until glistening. Lightly salt and pepper the ribs on all sides, and brown all sides, removing to the crockpot when they are caramelized to your liking.

In a food processor or blender, add all ingredients from tomatoes to Worcestershire, and blend until smooth. Pour contents of blender/processor over meat in crockpot, apply lid and cook at low heat for 8 hours. Shred meat with two forks and serve on corn tortillas with shredded cabbage, shredded cheese, lime wedges and cilantro leaves.
Desktop Breakfast: Warm Blueberry Compote and Greek Yogurt

Standard

Breakfast has always been a struggle for me, even as a kid. My mom would try her hardest to make me eat something before school each day and I just never wanted to. If I eat too soon after I get up in the morning I get an upset stomach, but I can’t hold off eating until lunchtime or else there’s no filling my stomach for the entire rest of the day.

I’m a 10:00 kind of breakfast eater. No earlier, no later. It’s the Goldilocks approach to breakfast. It’s got to be just right.

My far and away favorite quick breakfast is a slice of  buttered sourdough toast with a gently fried egg on top, heavily peppered and lightly salted, all runny yolk and tasty goodness. During the work week, though, this isn’t easily accomplished. Granted, my office has a full kitchen with a range and oven, but the last time I tried making an egg in there I had 6 different people hovering around wanting one. I decided it’s just too much, and I am not a short order kitchen.

I usually keep some individual packs of yogurt in the work fridge for snacks and breakfasts on days when I don’t have any. I go in spurts with brekkie stuff: for a few weeks I’ll make oatmeal packets, one week I’ll make muffins, another I’ll grab some English muffins and a jar of jam from the pantry and I’m set. My goal is to bring breakfasts to work for a whole week each Monday, so I don’t have to think about it in the morning as I perpetually run late (but please don’t tell my boss!). My bottom desk drawer is full of tea, vitamins, my tea cup and saucer, a set of silverware, my Trenta sized reusable Starbucks cup for water (24 oz. at a time means I don’t have to get up as often – and I drink 3 every day), and my chosen breakfast for the week if it doesn’t require refrigeration. A veritable cafe of healthy goodness.

This is a yogurt week, and I’ve been craving fruit lately. I was fresh out of oranges and bananas to take and slice into my yogurt this morning – sad day! While washing my hair in the shower I took mental inventory of the freezer and remembered I have a few pints of blueberries stashed in the back waiting for a rainy day. As I blew through the kitchen and made my coffee, I tossed my soup and a slice of bread for toast into my lunch bag, along with 1/3 cup of blueberries in a baggie and the honey bear off the counter. Iblew a kiss to the cat and ran out the door.

When my 10:00 hunger pangs struck, I put my blueberries in a bowl, drizzled on about a teaspoon of honey and eyeballed a tablespoon of water over the top. Covered with a paper towel and zapped for about a minute, the berries blew up and bubbled into a thin compote, into which I spooned the contents of my yogurt cup. I reminded myself to get a cute bowl from home (that matches my teacup, natch) to make stuff like this, because while a paper bowl is convenient, I like real ‘china’ when I’m dining a la desktop. It just makes the whole experience of eating at one’s desk a bit more civilized.

Warm blueberry compote

Warm Blueberry Compote
Serves 1

1/3 c. blueberries, fresh or frozen
1 T. water
1 t. honey

Place blueberries in a microwave safe bowl. Drizzle water and honey over, stir to combine. Microwave on high for 1 minute. Spoon 1/2 c. yogurt over the top, and dine a la desktop.

Smoky Spicy Sweet Potato Soup

Standard

Anyone pinching pennies knows that brown bagging (or cute coolering) one’s lunch saves a bunch of money on a weekly basis. I take myself out for lunch every now and again, but I really try to bring something every day.

I had a soup a week or so ago when I was under the weather that I’ve been dying to knock off. It was a vegan sweet potato soup with chipotle powder that was so silky and wonderful, I was sad that I didn’t buy the larger size. The nice man running the soup and prepared food counter at my favorite little lunch spot in walking distance of my office winked at me when I asked for the recipe, which told me I was on my own.

I bought some sweet potatoes at the store this weekend and roasted them last night, knowing I would make this soup tonight to tuck into my lunches all week long. it’s not vegan, but it’s still healthy, clocking it at under 250 calories a serving. A slice of buttered sourdough toast and a glass of hearty red wine were the perfect end to a cold winter’s day, and I have plenty for lunch for the next couple days.

IMG_8680 (1)

Smoky Spicy Sweet Potato Soup
Makes 4 generous servings

2 lbs red skinned sweet potato
1 T. butter
1 c. diced yellow onion
1/4 to 1/2 t. chipotle powder (start slow, this soup gets spicy quick. You can always add more but can’t take it back!)
1/2 t. smoke paprika
1 t. fresh rosemary leaves, roughly chopped
1 quart of chicken stock
1 t. worcestershire sauce
1/2 t. molasses
Salt and pepper, to taste

Preheat oven to 350*F. Wash sweet potatoes, pierce with a fork, wrap in foil and bake until easily pierced with a sharp knife, about 40 minutes. Remove from oven and set aside until cool enough to handle (potatoes can be roasted and stored in the fridge, still wrapped, for 2-3 days prior to use. Let them come to room temperature before using).

Melt butter in a 6 quart pot over medium low heat, add onion and saute until onion is soft, 3-5 minutes. Stir in chipotle powder, paprika, and rosemary. Slice potatoes in half lengthwise and scoop out of the peels, dropping them into the pot and mashing with the spices and onion (I peeled them and squished them with my hands before dropping into the pot, it was so much fun). Stir all together and cook for 2-3 minutes.

Pour in chicken stock, Worcestershire, and molasses. Add about a teaspoon of salt and simmer all together for 15ish minutes. Puree in a blender in batches or grab a stick blender if you have it and puree the soup until it is smooth, uniform and silky. Season with pepper and a bit more salt if you’d like, and more chipotle powder for the daring. Serve in warmed bowls with buttered sourdough toast for dipping and bowl wiping.

The Best Homemade Hummus

Standard

IMG_1761

If you’re like the majority of red-blooded America, you’re either hosting or headed to a houseful of people for at least one football game this weekend. What would January be without playoff games? I think for many (men, at least) it keeps the inevitable doldrums away. You get some time to be social, some healthy team rivalry, beer drinking time with buddies, and good food.

Football food falls into the same indulgent category as camping food in my book. It stuff that’s on the far end of the health spectrum, and oftentimes includes but is not limited to chicken wings, burgers, gooey baked dips, pulled pork sandwiches, and on a lot of buffets the inevitable veggie platter of carrots, celery sticks and broccoli with a bowl of ranch dressing for dipping. (The ranch, by the way, completely negates the health of the veggies for the most part. Just saying, ) A smorgasbord of tasty saturated fat, punctuated by a platter of vegetables. It’s nice to have something different.

And like many of you, we hosted some friends for the later game yesterday (go niners!). I’m on my annual campaign to health it up and in that trying to put out healthier snacks, for the most part. Getting away from the group favorite cheese board and bowl of butter and truffle salt-laced popcorn was a must. There were no wings, no sausages or spinach dip or sliders on the table. I went a different route and made hummus because I had everything I needed here and didn’t have to go back to the store to make something else, and I wanted to give us all a little something tasty and good for us, since we were eating fried abalone and tri tip for dinner.

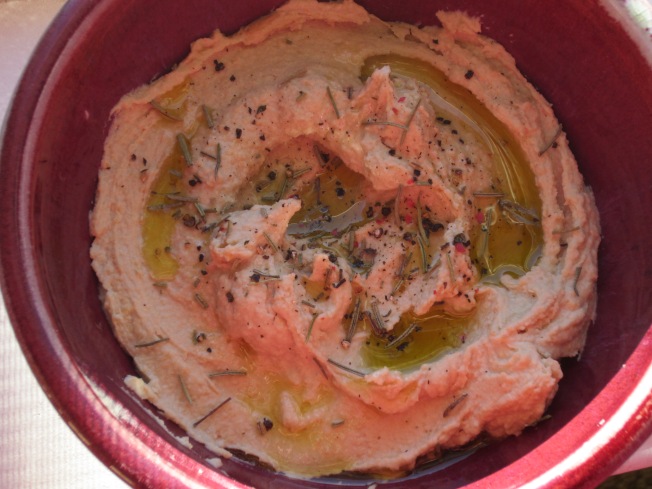
And so, hummus, the humble dip of champions, with a bag of pita chips and some carrots for dipping. Creative? Nope. But I made my hummus from scratch and have deployed the best method ever for doing so. The secret is, well, um, how do you say?… you have to peel the garbanzo beans.

Yes. Peel. The. Garbanzo. Beans.

So, if you’re done laughing at me, we can move on. Thoughts on absurdity aside, by peeling said garbanzo beans, you eliminate the sandy texture that generally comes with homemade hummus. The peels break down into what can only be described as grittiness, and my previous adventures in homemade hummus netted me precisely that. I’ve seen a hundred times over in as many recipes as I’ve looked at a suggestion or instruction to peel the beans, but I’m WAY too busy to do something so tedious. Except that, well, the product of the peeling is perfect, puffy fluffy hummus that you can’t get enough of, and I am remiss anytime I haven’t peeled my garbanzos and subsequently throw half of my hummus away. Peeling a can of garbanzo beans took me less than 8 minutes, including the time to gather up the ones that shot across the counter.

To peel your beans, open and dump the can (or for you hipsters boiling your own, boil them up and cool them then dump them) into a fine strainer, and rinse thoroughly, using your hands and some high-pressure from your faucet. A little garbanzo bean massage. This will take the skins off some of them, and rinses a lot of the sodium out of the canned types.

Then, grab a bowl and one by one, take the beans, with the pointy ends facing toward your palms, and squeeze the bean into the bowl. Try to aim, they’re slippery little beasts and will fly everywhere. Discard the skin. Tom Sawyer some kids into doing this if you happen to have any roaming around, they’ll have a blast. Repeat as necessary, then proceed with the recipe.

I have listed in here high-test olive oil, which can be described best as the stuff you bought at gold prices that you don’t use because the flavor is so delicate and grassy and gets lost in most food. Yeah, that one. Use it here.

On an unrelated note, does anyone have a recommended brand of commercially produced pita chips that they buy? Every single brand I’ve ever bought is nothing but pita chip DUST when I open it and it’s getting really old. I’d like to get a bag that is mostly whole chips, if it isn’t too much to ask. Anybody out there with a suggestion, for when I’m too lazy to make my own? Let’s see if any of you are brave enough to comment.

IMG_1758

Best Hummus Ever
Makes about 1 3/4 – 2 cups

1 15 oz. can of garbanzos/chickpeas (they are one and the same), drained, rinsed and peeled. I buy low sodium beans or make my own.
1/2 c. tahini paste
Juice of 1/2 of a juicy lemon
3 small or 2 large garlic cloves, finely minced or run through a press
1/2 t. salt, or to taste
4-6 T. water
Good, high-test olive oil for drizzling

Toss garbanzos into the bowl of a food processor, and whizz until they are powdery and uniform, close to a full minute. Add in the tahini, lemon juice, garlic and salt, and blend away for another minute, stopping to scrape down the bowl to ensure everything is incorporated. With the machine running, add in the water a tablespoon at a time, until the hummus is smooth and creamy and fluffy. Stop and taste it for consistency, as less water is more here, but you’ll need at least 4 tablespoons. It should be super fluffy and light. Adjust salt and lemon to taste.

Scrape into your favorite serving bowl and refrigerate for at least an hour. Before serving, drizzle with a few tablespoons of good olive oil, a couple cracks of black pepper, and a sprinkle of fresh rosemary if you have it. Or, use the olive oil and whatever spices/seasonings you’d like (smoked paprika, a dusting of cayenne, some minced fresh cilantro and lime zest, whatever sounds good). Serve with your favorite dippers.

Get Crazy Here

Standard

This, my friends, is a working girl’s breakfast. A breakfast of champions of the work place, lovingly prepared with my own two hands while speeding out the door in the morning.

If I’m smart and together, I’ll prepare it the night before and put it next to my purse so I don’t forget it. If I’m REALLY together I’ll make a few for the week and keep them in my desk. But the nice thing is that it can be thrown together so fast in the morning that if I forget the night before it only takes a second.

This is a humble instant oatmeal packet, in a homemade dress (or zip-top bag, if you so choose, but mine sounds more romantic). It means that I have a healthy, warm breakfast for a chilly fall morning without succumbing to the siren song of the vending machine or running out for an expensive snack or a cheap donut.

The idea here is a simple one: taking the instant oats packet and removing the extra crud that doesn’t need to be in it (I don’t care if my sugar clumps, I’d rather not eat the anti-clumping agent, thankyouverymuch). I eat a lot of overnight oats in the summer, but in the fall and winter I want something warm with my coffee. And you can’t beat the price: my little packs cost less than $0.20 each, and I reuse my ziptop baggies (recycling!).

The basics are this:

1/3 c. instant oats

A pinch of salt

1/2 to 1 T. brown sugar (or your choice of sweetener)

¼ t. cinnamon OR pumpkin pie spice OR apple pie spice

2 T. chopped dried apples, OR chopped dried apricots, OR raisins (optional)

You can swap out regular sugar or coconut sugar or turbinado sugar or whatever for the brown sugar. You can also leave it out and keep a small bottle of maple syrup or agave syrup in your drawer. I like the controlled aspect of the measured sugar here – if I drizzle syrup on top of my oatmeal the likelihood I’ll add more than I should is really high, and defeats the purpose of a healthy, whole grain breakfast. This is your choice, of course. If your willpower and drizzling skills are more honed than mine then this might be a good option.

The spices, too, are up to you. Clove, cinnamon, nutmeg, get crazy. You could do some chopped up dried apple with rosemary if you’d like, or dried apricots with some sage, whatever sounds tasty in your head. Raisins and clove? Orange zest and lavender? Get some, get crazy here. It’ll make your coworkers jealous, I tell you. The yummy smells wafting from your cube will drive them nuts.

School’s In

Standard

T-minus 24 hours and I’ll be a working girl again. An 8-5er. A breadwinner. A mover-and-shaker. A quivering mess of first-day-of-school nerves (!).

I finished my list of errands and To Dos for my Last Day of Freedom, and I’ve carefully penciled in some time for ‘just me’. Just me time includes some sewing (to hopefully finish a cute dress for my First Day), and a trip to town for some grocery shopping (this isn’t a chore for me, I love grocery shopping) and a new pair of jeans, since my new office has a CASUAL DRESS CODE. That’s right guys, I can wear whatever I want to work everyday. I just need to be clean and tidy and that’s about it. I am SO EXCITED.

Of course, though, I’m jittery and nervous. Like, what if they don’t like me nervous, and what if I can’t make friends nervous, and what if I’m making a terrible mistake nervous. I truly have First Day of School nerves, but this is almost worse, since my school nerves were usually delightful and buzzy and electric, this feels more foreign.

This tells me, however, that I’m probably making a great decision. The last two times I walked in to a job and didn’t have these nerves, well, let’s just say I learned something about my guts and how they check things.

Breathe. Anyway. Like any good little food obsessed girl, I’m already worried about what I’ll eat for breakfast most days of my first few weeks. Once I get settled into my desk I can designate a drawer for oatmeal, granola and snacks, but when a girl is in training it’s hard to say ‘can you hold that thought? I need some brekkie.’ I am not one of those people who can eat within a half hour of getting up so a nosh while primping is out. And getting up earlier to accommodate eating before leaving for work is a big fat Yeah Right.

What to eat, what to eat? Smoothies came to mind but they aren’t satisfying. I do love a nice scrambled egg in the morning, but this falls in to the Yeah Right category. I’m in love with Overnight Oatmeal, but this requires two hands to eat and I’m usually eating in the car when I’m headed to work. And Nick strictly forbids me to drive with just my knees (though I am a very good kneecap driver, for the record). An obvious solution here is an egg sandwich, but I don’t like them when they’re reheated, the egg gets rubbery and weird, not to mention the English muffin gets soggy.

Another obvious route is baked goods, something of the muffin or scone persuasion. The problem, though, is that they are usually so fat- and sugar-laden that one is better off eating a bagel with bacon and cream cheese on it (one of my favorite camping breakfasts). At least there’s protein in a bacon bagel sammie!

I like the idea of a muffin for breakfast, though. They are decidedly breakfasty, and a pan of them is more than enough for me for breakfast for a week; in fact it’s enough for one for breakfast and one for afternoon tea (which I also won’t be taking while I am training with someone – ‘one lump or two?’). I searched around and didn’t find too many that fit my bill – too fatty, to many ingredients, to many muffins in a batch, too too too. And then I found one, over here. (If you haven’t been over to Andie’s blog, well, get there. She is amazing. You’ll fall in love with her posts like I have.)

With a couple of substitutions from the original healthy recipe I made it even healthier. This muffin clocks in at around 185 calories/19 g. carbs/10 g. fat/6 g. protein per muffin, which leaves enough calories and fat in my daily count to add a smear of butter or reduced-fat cream cheese (YES… makes them like carrot cake). They also freeze really well, so make the whole pan, cool them completely, individually wrap them up nice ‘n’ tight in cellophane and freeze them inside of a zip top freezer bag. Pull one out the night before or in the morning to defrost for a quick breakfast.

Even Healthier Morning Glory Muffins
Adapted from recipe at Can You Stay For Dinner?
Makes 18 muffins (still kind of a lot, but I’ll send some to work with Nick)

1 cup all-purpose flour
3/4 cup whole wheat flour
1/2 cup almond meal
2/3 cup sugar or honey (I used honey)
1 1/2 teaspoons baking soda
1/2 teaspoon baking powder
1 teaspoon ground cinnamon
3/4 teaspoon salt
1/2 cup unsweetened apple sauce
3 large eggs
1 tsp. vanilla extract
1 (8-ounce) can crushed pineapple (including juices)
1 1/2 cups shredded carrots (2-3 medium)
1/2 cup unsweetened dried cranberries, or raisins if you prefer
1/2 cup sweetened shredded coconut
1/2 cup chopped pecans, toasted

Preheat oven to 350 degrees F. Line a 12 cup muffin tin with paper cups. In a large bowl, mix together flour, sugar (if using, otherwise mix the honey in with the wet ingredients), baking soda, baking powder, cinnamon, and salt.  In a separate bowl, beat together applesauce, eggs, vanilla and pineapple (including pineapple can juices). Stir egg mixture into the flour mixture, just until combined. Stir in the carrot, cranberries, coconut, and pecans. Scoop batter into prepared muffin cups. Bake in preheated oven for about 20 minutes, until a toothpick inserted into center of a muffin comes out clean.

Twofer Two: Pork Fried Rice

Standard

The second meal I made from that pork tenderloin and rice that we had on Sunday was Pork Fried Rice. Fried rice was a staple in my house, alongside egg burritos, when I was a poor hotel front desk employee. I made many meals for myself and friends out of a handful of this-and-that tossed in a pan.

Get crazy with your chopped vegetables. This dinner is a good Veg Drawer Cleaner Outer, use up that last sad stalk of celery, that wedge of bell pepper, hell you can even throw in lettuce if you’re not averse to warm greens. Seriously, use whatever here.

Fried rice will literally cook in less than 7 minutes, so make sure your ingredients are measured and your food is all chopped up before you turn your pan on. The most cumbersome part of making something like this is dicing up all of the components, making this is a good task to share with a spouse or kitchen partner.

Pork Fried Rice
Makes enough for 4-6 servings

1 cup (more or less) leftover pork tenderloin
1 1/2 cups diced vegetables (I almost always use napa cabbage, and whatever else is in the fridge: bell peppers, scallions, carrot, zucchini)
1/2 thinly sliced onion
3 eggs, cracked into a cup and gently beaten
4 cups cold cooked rice (we used brown, but white will work too)
Leftover sauce from Pork Tenderloin
-OR-
A mixture of 3 T. Soy Sauce or Tamari, 1 T. sherry, and 1/2 t. sugar or honey
4-5 T. canola oil (don’t use olive oil here, you want something with a higher smoke point)

Chop up and measure out all ingredients before heating your pan, as cooking goes QUICK. Break up any chunks in your refrigerated rice with tongs or a wooden spoon.

Get out your biggest, baddest, heaviest cast iron or non-stick skillet (I use my 12″ calphalon here and it’s BARELY big enough, you really want to be able to toss your food around). Heat your pan over high heat for a minute or two, and pour in a tablespoon-ish of oil. Swirl it around the pan and let it heat until shimmering and lightly smoking. Turn on your exhaust fan and prepare for battle.

Add onion to the pan and fry quickly (literally about a minute) until starting to char. Add in your mixed vegetable medley and fry for a couple minutes until also charring. Remove all vegetables from pan to a large heat-proof bowl.

Add more oil to the pan (2-3 tablespoons). When smokin’ hot,  dump the rice into the pan and quickly fry, turning with a folding motion to get all of the rice in contact with the pan bottom and rotating it around. It takes a couple of minutes, don’t rush it.

Pour the beaten eggs over the hot rice and fold in gently (I like getting egg chunks in my rice, stir more vigorously to break them down if you want) until egg is barely cooked. Pour the leftover pork sauce or soy sauce mixture over the rice and egg and stir to mix.

Add vegetable/onion medley back to the pan and quickly toss to reheat all of it.

Serve in bowls with additional soy sauce, chili oil and/or sesame oil on the side.

Twofer: Honey-Gingered Pork Tenderloin

Standard

It can be cumbersome coming up with a dinner idea some nights. I have a handful of ‘standards’ that I can whip up in a moment’s notice but there are evenings when even that fails me because I just don’t want to eat it. It’s hard for me to put my heart into something that I know I don’t want to eat, even if it is one of my favorites. These uninspired nights generally end up being bacon and egg nights, or even (eeek) ramen and toast nights. Don’t judge. Having the foresight to think up two dinners and only have to do the real cooking once is a life-saver. Most of those types of dinners around our house come from the Sunday Night Chicken Roast, but who’s roasting a bird when it’s a million degrees outside? Certainly not I, even with air conditioning. And to be honest, I’m kind of chickened out these days, we eat a lot of it.

Pork tenderloins aren’t something that make regular appearances at our house. The only pork persuasion  items that I generally buy with any sort of frequency are bacon and Italian sausage, and the occasional pork shoulder for a dinner party or carnitas. Sometimes I’ll buy a ham when they’re on sale around the holidays that warrant their immediate consumption. I sometimes get some fat pork chops when I’m blue and need gravy. I grabbed a couple tenderloins and froze them last week but only because they were fire-sale priced and really make for a fast dinner, as they cook in no time flat.

I managed to come up with a new twofer this week, which I’m a bit proud of. Night 1 was this Honey-Gingered pork tenderloin, with brown rice and foil-roasted green beans.  To make this a twofer, save about 1/4 of the pork tenderloin, and make double the amount of rice that you will need for dinner and save it for Night 2 Pork Fried Rice later in the week when you don’t feel like thinking up dinner (recipe to follow later this week).

I only made one pork tenderloin and used the entire amount of marinade. If you’re making two tenderloins like the recipe calls for, double the marinade so you have enough to boil down for sauce for dinner later in the week. The marinade was probably one of the best I’ve ever had, I didn’t even get to marinate it the entire time, either. I can only imagine how good it would have been if I pulled my life together and made it the night before like the recipe said! Also, for those who don’t eat pork, this would be amazing with turkey ‘tenderloins’, turkey breast or chicken breast.

Honey-Gingered Pork Tenderloins
Adapted from Gourmet magazine

Two 3/4-pound pork tenderloins (I only used one)
1/4 cup honey
1/4 cup soy sauce (or tamari)
1/4 cup oyster sauce
2 tablespoons packed brown sugar
1 tablespoon plus 1 teaspoon minced peeled fresh gingerroot
1 tablespoon minced garlic
1 tablespoon ketchup
1/4 teaspoon onion powder
1/4 teaspoon cayenne
1/4 teaspoon cinnamon

Pat pork dry and arrange in a shallow dish. In a bowl whisk together all remaining ingredients and pour marinade over pork. Turn pork to coat well. Chill pork, covered, turning it once or twice, at least 8 hours and up to 1 day.

Prepare grill.

Remove pork from marinade, reserving marinade, and arrange on a lightly oiled rack set 5 to 6 inches over glowing coals (or over medium high heat on a gas grill). Grill pork, basting with reserved marinade and turning it every 5 minutes, 15 minutes total. Continue to cook pork, turning it every 5 minutes, until a thermometer diagonally inserted 2 inches into center of tenderloin registers 155°F., about 10 minutes more. Let pork stand 5 minutes before thinly slicing.

For Sauce: Save the left over marinade! Pour into a saucepan, add 1/2 c. water, bring up to a boil and reduce the whole mixture by half. Drizzle a little over the sliced pork for tonight’s dinner, and save the rest for dinner later in the week.

Next up: Pork Fried Rice

Taking it Back: Spaghetti Sauce

Standard

For a few posts, we’re going to take it down a notch or two and go back to the basics at the request of one of my readers. Granted my cooking prowess has made me adventurous and has wooed me into making more complex things, but the best homemakers have a handful of their very favorites they can pull out at any time that please a crowd, are down-home tasty and have very little muss or fuss involved. It’s also nice to have a set of standard recipes that you can turn to that are cost-friendly and don’t break the bank. In times like these we can all stand to save a few bucks but also deserve to have a home cooked meal that we can sit down to and be proud of.

Enter the classics ~ well, my classics. In my freezer there are always a couple of things that are my go-to items for dinners: chicken stock, whole chickens, varying types of sausages (both pre-cooked and raw), boneless, skinless chicken breasts, and spaghetti sauce.

Spaghetti sauce, in my family, is the generalized term for what a lot of people call ragu, meat sauce, or ‘gravy’. Gravy is an entirely different thing to some Italian families than it is in the rest of the country; Italian gravy is a tomato based meat sauce, rather than a brown sauce made of pan drippings after roasting meat. I always have at least one container in the freezer, and the ingredients to make it are part of my general pantry so I can whip up a batch in a flash. When I want spaghetti sauce with dinner there’s very little that can be done to sway me. And while it benefits from all day, low and slow cooking, it is just as tasty when it’s simmered for a half an hour and then served.

This sauce is the basis for my lasagna, or is served either tossed with short pasta and ricotta or cottage cheese and baked, spooned atop a mountain of spaghetti, pooled on polenta, and I’ve even used it as a filling for calzones before, mixing in some cubed mozzarella and sauteed spinach before tucking into a pizza dough blanket (and it’s soooo gooood). By having some in the freezer, in the time it takes to boil pasta, defrost the sauce and make a salad, dinner is ready. It’s not just a mid-week must eat staple though; I like to think that my sauce is good enough for company, and none of my dinner guests have ever said otherwise.

Feel free to riff on this sauce and make it your own. If your grandma made hers with finely diced carrots and celery, then by all means add them. Same goes for fresh or canned mushrooms, fresh spices instead of the dried, the world is your oyster with this sauce. And the more you make it, the more it becomes ‘your sauce,’ evolving each time to become your signature dish.

This sauce is mildly spicy because of the hot Italian sausage, but it isn’t kid-unfriendly in the heat department so far as I’ve found. If you’d rather skip the spicy, go ahead and use a full pound of the mild sausage. To keep your calories and fat down, you can sub in turkey Italian sausage and plain ground turkey for the meats (but you’ll also lose some of the richness). Go ahead and add more of the aromatic spices to your liking, and even extra garlic if the mood strikes. And, if you aren’t a household that generally has an open bottle of red wine around, don’t go open one just for this. There are several bulk wine producers that make split bottles (they come in 4-packs) of wine that are readily available at your grocery store. They are nice to have on hand for something like this: use what you need, and freeze the rest in an ice cube tray and save it to toss in marinades and sauces that call for a bit of wine.

One thing you have to do, though, is taste your sauce while it’s cooking. I know that every diet magazine on the planet is shouting at everyone about the number of calories you consume while tasting dinner as you make it, but it’s essential to good cooking to taste as you go. I personally like to taste my sauce by dipping a slice of french bread in it. MMMMmmm…

Spaghetti Sauce
Makes 12-14 cups of sauce

1 T. olive oil
1/2 lb. mild (sweet) Italian Sausage
1/2 lb. hot Italian sausage
1/2 lb. ground beef (whatever fat level you’re comfortable with)
1 large  yellow onion (we’re talking softball sized), diced
4-6 cloves of garlic, minced
1 28 oz. can diced tomatoes in sauce
1 14 oz. can diced tomatoes in sauce
1 8 oz. can tomato sauce
2 T. dried basil
1 T. dried rosemary
1 T. dried oregano
1 California bay leaf
1 1/2 t. kosher salt
Red wine
Worcestershire sauce
Salt and freshly ground black pepper, to taste

Heat a large stockpot with the olive oil over medium heat. Add the mild sausage, breaking up with a spoon, and cook until brown. Remove from pan with a slotted spoon, and  cook off the hot sausage (if using), and then the ground beef, in the same manner. Avoid putting them all in the pot at once and crowding it, as it will steam your meat bits instead of browning them.

Remove excess grease from pan if necessary, leaving behind a tablespoon or two. Add the meats back to the pan, along with your diced onions and garlic. Sautee the onions and garlic until they are translucent, about 4-5 minutes.

Add in all spices (basil through bay leaf) and stir to marry with the meat and vegetables, then add in your salt, and cans of tomatoes and sauce. Using the 8 oz. sauce can as a measure, fill it with red wine and add it to the pan, along with a couple of dashes of Worcestershire sauce. Stir in thoroughly, and taste to adjust seasonings. Lower heat to a simmer, and let it go for at least a half an hour or as long as you can stand it.

Getting Over Myself

Standard

Well, me and my big mouth. Whenever anyone is doing any cooking or having any sort of gathering at all and we’re invited, the second thing out of my mouth (after thanks for the invitation) is ‘what can I bring?’ And while this usually results in salad, or a side dish, or even dessert, sometimes my brain and my mouth don’t work in harmony and I’ve suddenly signed up to make something that could be a disaster.

Growing up an an agricultural area as well as a mecca of all things slow food and hand crafted beverage, many of us have learned that home grown and hand made is almost always going to be far superior to something you’ll find at a grocery store. We’re blessed with good earth here, and almost everyone I know has a garden, a small flock of chickens, makes beer, makes wine (even in the garage production fashion). And as birds of a feather, our group of good friends and our families both cook like crazy people.

All of this isn’t to say that we don’t sit down to mow a row of Oreos every now and again, but you better believe that the milk we’re washing them down with is from a dairy within 100 miles of our front doors, you get me?

We have a birthday party coming up in which a friend has hand selected a goat to grill in the birthday person’s honor. Never eaten goat? You’re missing out on a tasty thing, friends. There will be lots of laughing and beer drinking and merry making while the goat is roasting away. When the grillmaster gives the signal that it’s done, it will be carved while the rest of us stand around drooling, waiting for a bite. And when it’s all cut up and ready for the eating, it will be served as Goat Two Ways: with fresh tortillas and pico de gallo, and Big Mouth over here said she’d bring homemade pitas and tzatziki. The yogurt spread is easy enough (and no I’m not going to make a batch of homemade yogurt, but I could). See, the thing is, I’ve never made pita bread before. Right, that.

So, I extracted my foot from my mouth and consulted my cookbook collection. None of my books had anything (though I don’t really own any that are specifically bread baking). My favorite website rarely fails me so I looked there first, et voila, Whole Wheat Pita Bread. And I even had everything to make them.

After reading the recipe and the comments I figured this couldn’t be much harder than making tortillas, but as a person with Yeast Baking Terrors, I just wasn’t sure. I’m a self proclaimed sore loser, and I hate to fail publicly, so I waited until Nick was at work to make my first batch in case they didn’t pocket or came out like frisbees, etc. He is always very supportive in my cooking ventures, and even the things that don’t come out exactly right or just how I want them are always applauded by him, even as I prepare to scrap whatever it was because I can’t ingest disappointment. But even with the best of cheerleaders, I still had to wait until he was at work and the cat was napping before I could bring myself to do this.

Yes, I could just go to the store and buy a couple packs of pita, but the only ones I really like are at Trader Joe’s. And as a Girl Unemployed, TJ’s is dangerous territory for me. And I’m not going all the way down there for $5 worth of pita when gas is $100 a gallon right now. I might as well at least try to make them. It’s not like I don’t have the time, right?

Well, I’m glad I tried, because I have a new feather in my cap and a stack of hot pitas. And the best part? They were really not hard at all. I don’t know what I fuss about, I really have to get over myself. And for my efforts I was rewarded with 7 gorgeous flat breads from just one batch. It would have been 8, but this one was lunch:

Whole Wheat Pita Bread
From Gourmet Magazine

1 (1/4-ounce) package active dry yeast (2 1/2 teaspoons)
1 teaspoon honey
1 1/4 cups warm water (105–115°F)
2 cups bread flour or high-gluten flour, plus additional for kneading
1 cup whole-wheat flour
1/4 cup extra-virgin olive oil
1 teaspoon salt
Cornmeal for sprinkling baking sheets

Stir together yeast, honey, and 1/2 cup warm water in a large bowl, then let stand until foamy, about 5 minutes. (If mixture doesn’t foam, discard and start over with new yeast.)

While yeast mixture stands, stir together flours in another bowl. Whisk 1/2 cup flour mixture into yeast mixture until smooth, then cover with plastic wrap and let stand in a draft-free place at warm room temperature until doubled in bulk and bubbly, about 45 minutes. Stir in oil, salt, remaining 3/4 cup warm water, and remaining 2 1/2 cups flour mixture until a dough forms.

Turn out dough onto a floured surface and knead, working in just enough additional flour to keep dough from sticking, until dough is smooth and elastic, 8 to 10 minutes. Form dough into a ball and put in an oiled large bowl, turning to coat. Cover bowl with plastic wrap and let dough rise in draft-free place at warm room temperature until doubled in bulk, about 1 hour.

Punch down dough and cut into 8 pieces. Form each piece into a ball. Flatten 1 ball, then roll out into a 6 1/2- to 7-inch round on floured surface with a floured rolling pin. Transfer round to 1 of 2 baking sheets lightly sprinkled with cornmeal. Make 7 more rounds in same manner, arranging them on baking sheets. Loosely cover pitas with 2 clean kitchen towels (not terry cloth) and let stand at room temperature 30 minutes.

Set oven rack in lower third of oven and remove other racks. Preheat oven to 500°F. I used my pizza stone, and put it in to preheat with the oven. Was afraid to lose one through the grates! They’re really sturdy, though, so right on the rack would work perfect.

Transfer 4 pitas, 1 at a time, directly onto oven rack. Bake until just puffed and pale golden, about 2 minutes. Turn over with tongs and bake 1 minute more. Cool pitas on a cooling rack 2 minutes, then stack and wrap loosely in a kitchen towel to keep pitas warm. Bake remaining 4 pitas in same manner. Serve warm.

Cooks’ note: Pitas can be baked 1 week ahead and cooled completely, then frozen, wrapped well in foil in a sealed plastic bag. Thaw before reheating, wrapped in foil, 10 to 12 minutes in a 350°F oven.