Category Archives: Seasonal

In Closing

Standard

Jenner

Dear 2012:

It seems like just yesterday that I was addressing you formally, asking you to straighten up your act and fly right, to slow down so time doesn’t fly so quickly. I wrote you an open letter pointing out that you weren’t being friendly so far, and respectfully requested that we do this thing together.

This was a hard year for me. And I’ll be the first to admit that it didn’t go according to plan (which reminds me, I need to not try to plan everything so much). My mantra was ‘this year sucks’ and it stuck with me. I had a lot of scary hurdles, ones with spikes and flames, set before me, each one higher than the one before it. Some I flew over. Others I walked around. A girl has to choose her battles.

I didn’t start working out more, but I’ve never been one to exercise and actually enjoy it, so something has to give. I would like to find something that doesn’t feel like such a chore when I do it thrice weekly, that doesn’t cost an arm and a leg to do (local yogis, I’m side-eyeing you). I did take my swim class, but when I wasn’t working I cancelled my gym membership because it was something I couldn’t afford and could live without. I didn’t lose the 30 lbs. that I wanted to either, but I’ve mostly made peace with that too.

I did have my garden this year, and while it wasn’t at my own little house it was still a nice little garden. In the coming year I’m joining forces with a friend who has a great spot for a garden and we’re going to double down on our efforts. And we moved, which was on the docket for the year. We moved under duress and it didn’t feel like the experience it should have been (but when is moving fun, right?). And all of our family and our friends pitched in and made it a breeze, we were so thankful. Are we in our perfect home? No. Do we love it and recognize our good fortune to find such a beautiful place to live that we can afford, in this outrageously expensive county? Yes. Someday we’ll have a house with a yard again, but for now an upstairs flat with hardwood floors, beautiful views and a gourmet kitchen is nothing to sneeze at and we are so thankful.

I got that ‘time’ that I whined about, in the form of not working a traditional job for the entirety of the spring and summer. While unplanned and entirely scary, it taught me a lot about myself, reminded me how to make a dollar stretch when you don’t know where the next one is coming from, and showed me just how much Having Not is better than Having (i.e. not having a job as opposed to having a high paying job that makes you physically and mentally sick, not having that new pair of shoes that are stunning and on sale but having a houseful of those you love over for dinner on that same $30, you get the idea). I was scared shitless most of the time that I wasn’t working, worrying about all kinds of things that were beyond my control. And just when I put my foot down and stopped worrying, I found a great job at an amazing company, doing something that I never ever thought I’d be able to do, much less do well. Getting out of my comfort zone for just a few minutes put me smack dab in the middle of an even better one. After a couple months at said job I was having lunch with a friend who was also my boss for a long time, and when I told her I was back in sales I expected her to laugh. And laugh she did, at the fact that I ran screaming from something and came full circle back to it. She praised my decision and said that I have a mind for it, whether I like it or not. She’s not one to sugar coat things and it made me even more proud of my decision.

And I’m still a stress case. I’ve always been one, even my mom will tell you that I have always had deep worries in my heart, most of them completely unfounded. It is who I am, and I’m OK with it. Being a worrywort stress case also makes me a control freak (Cadi? A control freak? Nooo…). Yeah I said it. If I can control a situation I don’t have to worry about it. Most of the time it’s helpful, the rest of the time it’s like herding cats. But it’s me. I did read an article yesterday about the top 10 jobs for control freaks, and wouldn’t you know that the first job listed is Sales? I had to laugh. And I didn’t do the swimming and yoga or as much gardening as I thought I should, but damn if I didn’t hone my sewing skills this year. I can’t stress out when I sew, because it requires so much single-minded thought that I just can’t think about anything else (just ask that loaf of bread that got forgotten in the oven this summer ~ always set a timer when sewing). And I have a handful of great new clothes and pillows for my house that are one-of-a-kind and mine all mine.

Looking back, 2012, I do see that there were a lot of good things this year, that came in strange packages. It took some long gazes at some of them to see what they really were. On this end of the year, I have to say you shaped up your act, 2012. And I also have to say, so did I.

See you around, 2012. And thanks, for everything.

~Cadi

Hearthside Happy Hour: The Sleigh Ride

Standard

It started with a text message, with a link to a food blog I hadn’t visited before. It continued with a trip to the store where the prime ingredient was on sale for a killer price, and concluded with an impromptu dinner around our little dining room table. The Sleigh Ride was born.

IMG_1734

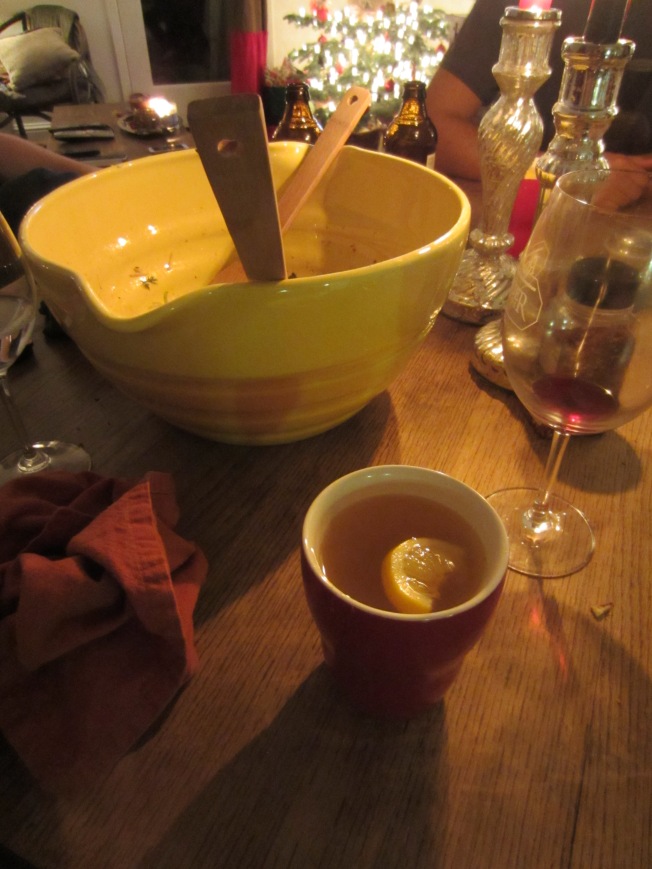
I’m a cocktail kind of girl, especially in the winter time. Nothing says cozy like a tummy warming mixed drink, especially a hot toddy. Warm adult beverages have the tendency to freak some people out – I’m not sure if it’s because they are usually of the apple cider or hot cocoa based persuasion, or what – but in my family, and in my house, a toddy is the cure for what ails you. And when we’re sick, there’s no cold medicine better than a toddy.

This is a deeply warming drink, just a hint of sweet, and the warm gingery goodness is perfect after dinner when everyone is sitting around the Christmas tree in a holiday haze. This will also make one just sleepy enough to turn in for a long winter’s nap and a great night’s sleep, because who are we fooling here, it’s a healthy dose of booze.

And finally – rye. Bourbon and whiskey drinkers, have you ever had the great pleasure of drinking rye? Rye whiskey is made with mash of at least 51% rye in order to be called such; we are fans of the Bulleit Rye, which is 95% rye. It’s zesty and peppery and delicious, and plays so well with both ginger and lemon. Our band of buddies discovered a deep love of rye a couple of summers ago (where we spent an afternoon mixing it with ginger beer, lime and salt on the rocks and devouring every drop), and haven’t looked back. My first love of brown liquor was and will always be bourbon, but rye is catching up fast.

And so, this evening when you’re done with your chores and baking and shopping and wrapping, make yourself a nice hot Sleigh Ride, and sink into your favorite chair for a spell. I won’t even make you resist the urge to sing yourself a little Christmas carol: Just hear those sleigh bells jingle-ing / Ring ting tingle-ing too / Come on, it’s lovely weather / For a sleigh ride together with you….

IMG_1735

The Sleigh Ride
Makes 1

2-3 thin slices of ginger
1.5 oz. rye whiskey
2 t. honey
a nice lemon wedge (use a Meyer lemon, if you can get your hands on one)

Heat a cup of hot water and the ginger slices in a pan on the stove until boiling (scale this up, will ya – you’re going to want another I promise). While the water heats, combine the rye and the lemon in your favorite cheery mug. Pour hot water over rye and lemon, holding back the ginger. Stir in honey, find your favorite chair, and enjoy.

Switching it out

Standard

Our home is in a constant state of evolution. It’s no great secret that the key to making a house a home is to make it beautiful but inviting, lovely and lived-in. Somewhere between Please Use A Coaster and Of Course You Can Put Your Feet on the Sofa. Striking that balance isn’t always easy.

One thing I can change seasonally to make things feel bright and new and lovely are the surface decorations in my living areas. Changing out the covers on the sofa pillows, getting a different colored throw out of the linen closet, and adding a seasonally appropriate tablecloth are a couple of quick fixes that instantly make the place spiffed up. Well, that and vacuuming. What is it about hoovering the house makes it look instantly polished? You’d think that would make us do it more often.

Anyway. I wanted new pillow covers and of course I’m too cheap to buy them outright. A trip to the fabric store during a particularly coupony sale netted me a piece of tapestry that I’ve been coveting for MONTHS. I bought a yard, and found a remnant in a bin in a light peacock blue microsuede that nicely complimented the first piece I found. Finally, a piece of peacock blue trim that was clearanced out for $0.97 a yard (down from $6!). And all for about $40. Not exactly cheap, but the pillows I love and covet in my favorite boutique-y stores are usually about that much for just the cover, never mind the actual pillow insert, for a 20″ pillow.

To my sewing corner I went. I have a storage ottoman that I keep some of my shears and things in, and in it I found some beautiful complimentary green remnants in there that I had forgotten about. I make a practice of haunting the remnant bin at the fabric store for this very reason. I’ve gotten some beautiful pieces of fabric, and good sized, for 50% off the bolt price this way. By using some of these pieces along with the two I just bought, I had enough fabric recover a seat cushion for one of our occasional chairs and the throw pillows that go in it. Score!

What I didn’t have were zippers. Well, I’d gotten this far, and I was in that zone where nothing was going to stop me but the power going out. I was just going to have to make envelope backed pillows, which to me are easier anyway.

This pillow style is a great project for a start-up sewer. It’s really forgiving, and you don’t have to fuss with making button holes or installing a zipper, both of which can be intimidating and difficult when you’re learning (and I still fight with zipper installation, to be honest with you). And when you’re done you’ll have something lovely to enjoy every day.

Here’s what you’ll need to make your pillows:

  • Your pillow fabric(s)
  • Thread in a matching or complimentary color to your fabric(s)
  • Pillows

Here’s what you do:

Complete step 1 and/or 1A before fabric shopping if you already have the pillows at home, otherwise you can do the math portion of the project at the fabric store after picking out your pillow forms. Taking a tape measure and calculator will be helpful, and the folks at the store are always happy to help out with questions.

1. If your subject pillow has a removable cover on it you’re ahead of the game. Remove the cover, flip it inside out, and measure it top to bottom, and in the case of a non-square/rectangular pillow, from left to right as well. Write down your measurements for reference. My pillow covers are 18″ squares from edge to edge, with a 1/4″ seam allowance, making them about 17 1/2″ across on the inside of the seam placement. I like my pillows to fit tightly inside of the covers so I make them a little smaller than the pillow itself. Keeps them fluffier that way.

1A. If your subject does NOT have a removable cover and you want to make one for it don’t fret. Get out a tape measure or yard stick, grab your pillow, stretch the corners out, and measure from corner to corner along one side. This guy is 18″. Again, I like my pillows to fit snugly in the case so my front piece is going to be cut to exactly 18″.

2. Take that trusty tape measure or yard stick and measure your square on your chosen fabric, checking for pattern placement. Sometimes its worth buying a little more fabric than you need in order to get the right look on your pillow, so take this into consideration before you go to the cutting counter at the fabric store. If you have a smaller print it’s easier to line up your shot, but on a large pattern sometimes it’s not so easy. Another trick is to make a paper template of your square and use that as a guide so you can really see what your pillow is going to look like when it’s completed.

3. Grab your contrasting fabric, if you’re using one, otherwise keep going with your original fabric. To make the envelope back, you want your overlap to be a good 3-4″ in the center of the pillow, to keep it’s belly covered. I take my pillow length, divide by two, and add 4 to get the right amount of overlap. This provides ample room for your seam allowances as well as hemming your raw edges in the middle.

The equation for my pillows is this:
18 / 2 = 9
9 + 4= 13

My envelope flaps need to be 18″ wide and 13″ tall. Measure and cut two (2).

4. If you didn’t use pinking shears zig-zag one long edge of each of your two pillow back pieces to check the fray. On one of the long edges on each of your flap pieces, fold each of the zigged pieces down about a half an inch on the wrong side of the fabric, press and pin in place. Sew down with a 1/4″ seam allowance.

5. Turning the right sides of the fabric together, lay the two envelope pieces over the pillow front and pin in place, being sure to put the bound edges facing the center of your square.

6. Sew around the edges of your square with 1/4″ seam allowances, and again if you didn’t use pinking shears zig-zag around the outside edges of the pillow to keep the fray down. Flip inside out, cram in your pillow, fluff accordingly, and VOILA!

7. Be smug about your crafting abilities and your smart new pillows.

Now, wasn’t that easy? If you shop the sales and remnant bins you can find some gorgeous fabrics for a fraction of the retail price and make pillow covers that look like they cost a fortune. Happy sewing!

Get up already

Standard

Hold the phone. In cruising the internet the other day I came across this recipe.

Yes. Bacon. Booze. Maple. Popcorn. Popcorn popped in bacon grease. With dry roasted peanuts. What’s not to love here?! I have no words, I have no description, but I have some advice: Be sure to make it when you can give it away IMMEDIATELY, because eating the whole tray is not good for one’s diet aspirations.

Why are you still sitting there? Take this in the kitchen and get busy, kids!

Tipsy Maple Corn
Adapted from Food52

This recipe makes a boatload. I found that I had a good amount of the syrup left over (which is fine, we’ll drizzle it over ice cream or something), but if you want to use the whole of the syrup for the corn, increase your popcorn by 1/4 cup, popping it in batches. Read the whole recipe first and then attack, as the coating method used here is different than regular caramel corn.

  • 2 tablespoons bacon grease, or non flavored vegetable oil
  • 1/2 cup popcorn kernels
  • 1/3 cup bourbon (they used Jack Daniels, and I had none. So bourbon it is.)
  • 1/2 cup pure maple syrup
  • 1/2 cup unsalted butter
  • fresh ground black pepper
  • 1 cup chopped dry roasted peanuts
  • 3 pieces prociutto, lightly fried until crispy, and minced (they called for pancetta; again, working with what I had here. Good smoked bacon would work too. Use about 3 oz. total)
  1. Place the bacon grease in a 3 quart dutch oven with a lid. Add the kernels and place the covered pot over high heat. Once the popping begins, gently shake the pot to keep the kernels from burning. Once it is done remove the lid and set aside. Preheat the oven to 350 degrees.
  2. In another small pot add the bourbon and heat it to burn off the alcohol and reduce it by half. Add the syrup and butter and heat until the butter is melted, whisking to combine.
  3. Place the popcorn, peanuts and the prociutto into a large mixing bowl. You want to sprinkle a little of the syrup over the corn a little at a time. You want to stir as you do this. Take your time otherwise the corn will saturate with syrup and collapse and just be gooey. (OK, here’s what I found: I drizzled on just over half of the syrup IN TOTAL, adding just a bit at a time and stirring thoroughly, Heed this warning and go sloooow, stirring a lot with a pair of spatulas before drizzling on more syrup. Reserve the remaining syrup.)

  4. Once it is coated put it on a sheet tray and spread it out, giving it a couple of dashes of freshly cracked black pepper (less than 1/8 tsp). Then place it in the oven for 20 to 30 minutes, stirring every 10-12 minutes. I drizzled on just about half of the remaining syrup on the first turn, turning to coat (there was a bit left on the bottom of the pan that caramelized and crackled).  Corn will not be completely crispy on the finish, but it will dry as it cools and get a nice kettle-corn type coat on it.

I also transferred mine to a layer of paper towel on a clean baking sheet, so some of the butter could absorb off of the corn. It was a tad oily when it came out of the oven. But LOOK at this halloweeny, crispy, bacony goodness:

Little Girls and Little Things

Standard

I stopped by the market yesterday to pick up a bag of spring mix and some apples. My little market has the greatest of the great local produce and it’s my favorite place to get first-of-the-season autumn apples. I picked out a couple of winners (Arkansas blacks and pink ladies) and headed to the check stand. On my way there I passed by a display of nuts still in their shells. I circled once, twice, and then swooped up a small bag to bring home for my coffee table.

The simple display made me think of my grandparents’ living room, where my Grams always had a bowl of unshelled mixed nuts on the coffee table with a pair of silver crackers during the fall and winter months. Walnuts, pecans, almonds, filberts (which I later learned are hazelnuts) and Brazil nuts, who have a less than P.C. name for many of a certain generation. We had to google their proper name yesterday when I got home.

I spent many an afternoon as a little girl during the adults’ cocktail hour, trying to crack these nuts open and get to the sweet meats inside. I always had the hardest time, either not being able to get my small hands around the cracker to get enough grip to crack the nut open, or getting enough leverage somehow (usually using both hands) and smashing the nut to bits that went everywhere (because I didn’t have a hand under my work). She never got mad, and neither did Poppa. Someone would always show me the best way to attack the nuts for good cracking, or crack them for me when I was frustrated and didn’t want to try any more.

I got older, my skill got better, and I would try to crack the walnuts and pecans and Brazils open and keep the nut meats intact. It’s harder than it sounds; my dad and my grandpa are both pretty good at being able to mine entire halves from walnuts and pecans. And my Granny was always pretty good at it too, when she was a bit younger.

As I sat on the couch with the cat tonight, with my silver cracker and my bowl of nuts, it was a small joy in my day thinking back on these times gone by, being a little girl and the little things in life. I’m sure if I call my Grams tomorrow she probably has a bowl of unshelled nuts on her coffee table, and I take some comfort in knowing that even though the world around me is changing so much every day, there are still some things that I can depend on. Simple things, like a bowl of nuts and not being able to crack them correctly.

Toast and Jam

Standard

Well, how has your summer been so far? Are you crossing off summery Bucket List items left and right, or are you taking a more relaxed, lazy approach? I’m doing a bit of both this year – being blessed with the time to relax and do more than I’ve been able to do for many summers. The weather has been mild and not too hot for the most part here on the West Coast. There’s been camping, barbecues, playing at the river, and of course some jam making.

Oh, the jam making. I was blessed with two HUGE boxed overfilled with the most beautiful plums. Not sure what kind they are? I don’t think they’re Santa Rosas, anyone with more fruit identification skills out there have any idea?

They’re juicy, with creamy yellow- to red fleshy interiors. And they aren’t free stone (bummer). Not being free stone they are a bit of a (read: complete) pain in the ass to process, as you have to cut them off the pits in order to glean any kind of flesh from their little bodies. But darn they’re tasty.

I’ve processed about 15 pounds of them so far, and have about, oh, 30 left hanging around, as evidenced by that picture above. Nick said to me very seriously yesterday that no one expects me to process all of these plums, we can use what we want and dispatch the rest. The only thing holding me back from canning them all is the sheer number of jars that it would take to can this many plums. (Those of you in the immediate area, the plums that are going to land on your front porches in the next 24 hours are not from me). I’ve already blasted through a flat of pints and a flat of half pints making Cinnamon Plum Jam and a batch of Savory Plum Chili Sauce, both of which came out great.

The Cinnamon Plum Jam was a new one for me this year. I found this blog a few weeks ago, and when I read this recipe I knew I had to make a cinnamon-laced plum jam of my very own. I know many of you out there are pectin purists, which translates that you don’t use any. Hats of to your skills! I am impatient and can’t handle stirring over a hot cauldron for the amount of time it takes to process fruit without pectin, so I use it the majority of the time. I plan to get out my big girl pants and make a pectinless version with some of these plums, but for now I made the recipe on my pectin box and dropped two 3″ cinnamon sticks into my hot lava jam boil, fishing them out before I canned it up. The result was a lightly scented and flavored jam of the most luxurious taste and texture. Just look at this:

The ultimate jam test, though, is how it tastes on toast. I am deeply in love with toast; heavily slathered with salted butter, seared under the broiler and not in the toaster, rendering the outside crisp and leaving the inside soft. And folks, I’m proud to announce that I found THE BEST bread recipe, which gave me the most amazing toast I may have ever had. No kidding.

Ordinarily and up to now, sourdough toast is my favorite. Being blessed with true San Francisco sourdough in my Outer Bay Area existence has spoiled me and mine with some of the best bread on the planet (should I ever have to give up gluten, well, perish the thought). This new bread is gently sweet, with a nice light crumb. Nick and I agreed that it smelled like graham crackers when it was cooling on the rack. Waiting for it to cool was the longest hour of my life.

The best part about this new loaf is that it’s a no-knead loaf, with only one rise. These two caveats make this a great loaf even for a beginning baker, especially one with yeast terrors. You literally mix it up, plop it in a greased loaf pan, let it rise, and bake it off. And for singletons and/or couples who don’t eat a lot of bread, it only makes one normal sized loaf. Between the ease of the recipe and the yield this might be the perfect sandwich loaf. The recipe has a lot going for it.

Those of you that do bake bread are going to see that it’s 100% whole wheat and doesn’t call for vital wheat gluten to help with the rise, which struck me as odd (and made me excited, since I’m too cheap to buy a bag and thus have none). The bread rose like a champ on my counter,  gaining lofty altitudes high above the edge of the loaf pan. It rose a bit more in the oven, with a gently browned crust, and popped right out of the loaf pan after a brief respite on the counter. In short, even in the long version of the story, this bread is perfect. And the toast this morning? Heavenly.

No-Knead 100% whole Wheat Bread
from King Arthur Flour website

Makes one nice loaf

1 cup lukewarm water
1/4 cup orange juice
1/4 cup melted butter or vegetable oil (mmm…butter)
3 tablespoons molasses, maple syrup, dark corn syrup, or brown sugar corn syrup (I used dark molasses)
2 teaspoons instant yeast
1/4 cup Baker’s Special Dry Milk or nonfat dry milk (I used nonfat and it worked just fine)
1 1/4 teaspoons salt
3 cups King Arthur whole wheat flour, white whole wheat preferred

Heavily grease an 8 1/2″ x 4 1/2″ loaf pan. This loaf tends to stick, so be sure to grease the pan thoroughly with non-stick vegetable oil spray.

Combine bine all of the ingredients in a large bowl. Beat the mixture vigorously for about 3 minutes; an electric mixer set on high speed works well here. You should have a very sticky dough. It won’t be pourable, but neither will it be kneadable. Scoop it into the prepared pan. (Take some care to level it out and push it into the corners of the pan. It may fight a bit, but you risk an uneven loaf if it isn’t leveled out.)

Cover the pan with lightly greased plastic wrap, and let it rise for 60 to 90 minutes; it should just about rise to the rim of the pan, perhaps just barely cresting over the rim. (I let mine go a full hour and it rose about 1/2-3/4″ above the pan.)

Preheat oven to 350*F. Uncover the bread, and bake it for about 40 to 45 minutes, tenting it with aluminum foil after 20 minutes. The bread is done when it’s golden brown on top, and an instant-read thermometer inserted into the center registers between 190°F and 195°F. Remove it from the oven, and after 5 minutes turn it out onto a rack. Brush with melted butter, if desired; this will keep the crust soft (I didn’t bother, and the crust was still soft the next day). Cool the bread completely before cutting it.

Putting it together

Standard

I was on my feet all day working a wine event and realized I didn’t have a dinner plan. The horror. Being food obsessed, this isn’t something that gets past me very often. I make my meal plans for at least 4-5 days at a span so I always have something yummy in the wings waiting to be prepared. That day, though, my mind was melting in the heat and my best-laid plans were all but gone. This, roughly translated, means that nothing that I had on my plan sounded good.

When I hopped in my car at the end of the day and tried to put something together that wasn’t a vat of frozen yogurt consumed in an ice cold shower. Something that didn’t require standing up too long since my dogs were barking, and something that was tasty and cool and refreshing, that didn’t require an additional trip to the store. Once I had slipped in to the sublime coldness of my air conditioned car I wasn’t getting back out until I was home sweet home.

I first made this shrimp cocktail many years back on an equally mind-melting night. I packed up my picnic hamper with cold beer and fresh tortilla chips and went over to Nick’s house, where he had a pool and air conditioning (I had neither of these things). We sat on the deck in the breeze and stuffed ourselves with chips and shrimp cocktail and ice cold beer, and declared this dish a withering-heat winner.

Food Purists take note: yes, I do know that this isn’t traditional ceviche. For those who are unsure what ceviche is, it’s fish and seafood cooked only with citrus juices, generally lime, whose acids ‘cook’ the fish. But Rick Bayless knows his Mexican cuisine, and I trust his naming of this concoction. It’s very similar to the coctail de camarones you get in a Mexican restaurant. And yes, it calls for ketchup. Think of it in this application as a pre-seasoned tomato sauce base (and don’t even try to use tomato sauce as a substitute, it won’t taste the same and you’ll be severely disappointed. You’ve been warned).

One could go about the shrimp preparation a number of different ways. The suggested poaching in lime water makes for succulent, soft shrimp, but in a pinch I’ve poached them with out the lime water when I didn’t have enough for the completed dish. I’ve also made this with defrosted, precooked, previously frozen deveined shrimp and no one was any the wiser. It’s a great dish to take to a barbecue or potluck, as well as for company. It’s surprisingly filling, too. So on a hot night when you have some folks over, a margarita or two or some icy cold Mexican beer and a great big communal bowl of this is a festive alternative to a sit down dinner. Make it ahead and stir in the avocado just before serving (it gets cloudy otherwise), serve some grill-roasted corn on the cob with chile powder and lime, and it meets or beats every taqueria whose coctail de camarones you’ve dared to try. Give it a whirl, you won’t be disappointed.

Ceviche de Camaron: Shrimp Ceviche “Cocktail”
by Rick Bayless, via Epicurious

1/2 cup plus 2 tablespoons fresh lime juice
1 generous pound unpeeled smallish shrimp (I prefer the ones that are 41/50 count to a pound)
1/2 medium white onion, chopped into 1/4 inch pieces
1/3 cup chopped fresh cilantro, plus several sprigs for garnish
1/2 cup ketchup
1 to 2 tablespoons vinegary Mexican bottled hot sauce (such as Tamazula, Valentina or Búfalo, the latter being on the sweet side)
About 2 tablespoons olive oil, preferably extra-virgin (optional, but recommended to smooth out sharpness)
1 cup diced peeled cucumber or jícama (or 1/2 cup of each)
1 small ripe avocado, peeled, pitted and cubed
Salt
Several lime slices for garnish
Tostadas or tortilla chips, store-bought or homemade or saltine crackers for serving

1. Cooking and Marinating the Shrimp.
Bring 1 quart salted water to a boil and add 2 tablespoons of the lime juice. Scoop in the shrimp, cover and let the water return to the boil. Immediately remove from the heat, set the lid askew and pour off all the liquid. Replace the cover and let the shrimp steam off the heat for 10 minutes. Spread out the shrimp in a large glass or stainless steel bowl to cool completely. Peel and devein the shrimp if you wish: One by one lay the shrimp on your work surface, make a shallow incision down the back and scrape out the (usually) dark intestinal tract. Toss the shrimp with the remaining 1/2 lime juice, cover and refrigerate for about an hour. Spare yourselves, kids – get the shrimp that are already peeled and deveined. No one will know but you.

2. The flavorings.
In a small strainer, rinse the onion under cold water, then shake off the excess liquid. Add to the shrimp bowl along with the cilantro, ketchup, hot sauce, optional olive oil, cucumber and/or jícama and avocado. Taste and season with salt, usually about 1/2 teaspoon. Cover and refrigerate if not serving immediately.

3. Serving the ceviche.
Spoon the ceviche into sundae glasses, martini glasses, or small bowls: garnish with sprigs of cilantro and slices of lime. Serve with tostadas, tortilla chips or saltines to enjoy alongside. We dispense with the additional dishes and eat it out of the big bowl like savages. You may do as you wish, it IS lovely in a tall glass with a couple of shrimp hanging off the side, with the extra lime slices and cilantro sprigs.

Working Ahead:
The ceviche is best made the day it is served. The flavorings can be added to the shrimp a few hours in advance.

Way Back

Standard

Does anyone else out there remember pudding pops? On a recent trip to the grocery store I had a sudden want for them (I’ve been on a big frozen dessert kick lately with the uptick in the mercury) and in wandering the frozen food aisle was bereft to find they didn’t have any. And when I asked the kid who was stocking the cases if they still carried them, he questioned what they were, and asked if I maybe meant fudgesicles? Obviously they’ve been gone of the shelves longer than I thought, and I suddenly felt like I was eleventy-billion years old. I wanted to ask this whippersnapper if he knew what a VHS tape was and if he’e ever heard of a man named Bill Cosby, but resisted the urge to completely embarrass myself and wheeled my cart away in shame.

After traveling through the meat counter, the deli and the produce department, I had an idea. Looking at the strawberries in my hand, I decided to try to make myself some pudding pops. Even if they weren’t the same silky consistency, they would probably be pretty damn good. I wandered to the baking aisle.

I never realized there were so  many flavors of pudding, I’m such a chocolate pudding kid that I never even thought that they made flavors other than that and vanilla. There was butterscotch, caramel, pistachio (in a very fetching shade of mint green, might I add), chocolate, milk chocolate, Oreo cookie and cream, vanilla, french vanilla, banana, and the one I settled on: cheesecake. I came up with a cold dozen different combinations of pudding and adjuncts with which to make pops; I told myself I was pudding-blind and to put back the butterscotch, with a silent promise to make the banana-butterscotch pops dancing in my head the next time if the first batch came out edible.

Back at the ranch, I rinsed and dried some strawberries and whizzed together my pudding and milk. I stirred in a little bit of vanilla extract to give it a more homemade flavor, though who was I kidding; I bought the fat-free sugar-free mix and there’s no real way the pudding was going to taste homemade. I know I crow a lot about only eating things that a 5 year old can pronounce and that processed food is the downfall of society. But sometimes a girl needs a mouthful of junk. And fewer calories and fat. And besides, I added strawberries, that had to health it up at least a little bit.

With the strawberries sliced and gently folded into my pudding, I filled up the ice pop molds, which was not as easy as it sounded. I left the strawberries in big chunks and my molds are the skinny, flat variety, so it took some finagling. Next time I’m going to mix up the pudding in a zip top bag and cut off a corner of it to faux-pipe the mixture into the molds. Necessity is the mother of invention, and I need to keep more of the pudding off the counter next time. I’m sure Bill Cosby never had this problem way back when.

If you venture out into making these, be sure to give the molds a couple of good smacks on the counter after filling, to force the air bubbles to the top. Don’t worry about splashing, the pudding is fairly set up. Total cost for 10 pops was less than $2, and each pop is less than 40 calories according to some quick math. Wallet and waistline friendly!

Strawberry Cheesecake Pudding Pops
Makes 10 in my ice pop molds, will vary with mold size

1 package instant Cheesecake flavored pudding (I used sugar-free fat-free)
2 cups cold milk
1 t. vanilla extract
1 cup sliced strawberries
1 graham cracker, crushed

In a mixing bowl (or a zip top plastic bag), combine the milk, pudding and vanilla, and prepare according to package directions. Gently fold in the strawberries, and fill clean ice pop molds with the mixture, leaving a bit of room at the top for expansion (less than 1/4″ headspace). Sprinkle with graham cracker crumbs, insert popsicle sticks, and freeze until firm (1-2 hours).

Feeling Green?

Standard

One thing I’m not is Irish; my people hail from Italy, Spain and Portugal. Like the rest of America, though, I get my green out and get my Irish on for St. Patrick’s Day every year. I washed my favorite green dress yesterday, bought some Guinness and some whiskey, and made a batch of Irish Cream so we could spike our coffee this morning.

Wikipedia says that – what, no history lesson? Well, for those that are interested to know who St. Patrick actually was, here’s some info. He was an interesting fellow, and is the most widely celebrated saint in the world. And for the rest of you lot, I give you the recipe for Irish Cream.

While this isn’t the exact consistency or sweetness of the little brown bottle on the shelf, it comes pretty close, and I like that it isn’t as thick and that I can adjust the flavors to my liking. I also made the Unemployed House Wife version, as I found myself without any freeze dried coffee, and used about a quarter cup of cold, strong brewed coffee instead. Those little insta-packets that come from America’s Favorite Coffee House work brilliantly in this application, if you have them.

You’ll see that this recipe calls for what amounts to enough whiskey to bring down an elephant. I’ve successfully made it with only 1 cup of the hooch, but hey, if you aren’t driving anywhere or are going to rebottle it to give as gifts, make it as leaded as the recipe says. Your hostess and St. Patrick will thank you.

Get out your blender, and put on a pot of coffee, because by the time the joe is finished your Irish Cream will be too. It does taste best when it’s refrigerated for a bit, if you can stand it, but if not just dive in. I won’t tell.

Happy St. Patrick’s Day to you all! Be safe, wear green, and be merry!

Irish Cream
From Cooks.com 

Makes about 5 cups, which goes surprisingly fast.

1 3/4 c. Irish whiskey
14 oz. can sweetened condensed milk (NOT EVAPORATED)
1 c. (1/2 pt.) whipping cream or half and half (use the heavy cream, you won’t be sorry)
4 eggs*
2 tbsp. chocolate flavored syrup
2 tsp. instant coffee
1 tsp. vanilla extract
1/2 tsp. almond extract
In a blender, combine all ingredients; blend until smooth. Store tightly covered in the refrigerator for up to 1 month. Shake before serving. Makes about 5 cups.
*If you’re worried about egg safety in your area, you can substitute either pasteurized eggs, found near the regular eggs in most markets, or powdered egg substitute, reconstituted according to the package directions.

Liquid Sunshine

Standard

Before it moved to the new house, I picked all 18 (that’s right, 18!) of the Meyer lemons off of my patio tree and tucked them gently into a bowl in the fridge, with dreams of making something tasty. Meyer lemons are not known for their extended shelf life, and are fairly delicate little fruits, so they were handled with care and reserved for something wonderful.

I’m the sentimental sort with things that I grow – the first of anything inevitably goes bad on the counter or in the fridge while I look for the prefect recipe to showcase this amazing thing that I nurtured into edible loveliness. I really have to quit doing this, what with all of my crowing about growing my own food and not being wasteful. I’m aware of this shortcoming and it’s something I’ll work on this year, starting with the lemons.

I could make lemon bars, lemon loaf, lemon marmalade, lemon curd. And I still might, I juiced every drop out of most of the lemons (there are three still lolling in the vegetable crisper for cocktails to be determined). I wanted something a little more permanent, or at least something that was going to last a little longer than a pan of confections. I also like using all of something when I can, sort of the whole ‘nose to tail’ approach to my food.

Yesterday I whipped out the vegetable peeler and got to work on the lemons, gently peeling the sunny golden peel away from the creamy white pith. My version of nose to tail eating of these precious lemons is going to be limoncello, then candied lemon rinds from the spent peels that made the limoncello, and squeezed the juice from all the lemons and froze it in half cup measures for later batches of baked goods or lemonade. Not bad for a half hour’s work.

The limoncello is already turning the most beautiful shade of marigold, looking like bottled sunshine sitting on the kitchen counter. And this summer, when the mercury hits a hundred degrees (and it will), a bit of this drizzled into a glass of soda water with some ice will make balcony time that much sweeter.

Speaking of sweet, this recipe comes out REALLY sweet. The last time I made it I cut the sugar/water down to 1 1/2 cups of each, and I preferred the less sweet version that was the outcome. Oh, and do what the Italians do: when all is said and done, stick the bottle in the freezer. Ice cold limoncello is the only way to fly!

Limoncello
Recipe from Giada DeLaurentiis

10 lemons (get Meyers if you can)
1 750 ml bottle of vodka (nothing expensive here, folks)
3 1/2 cups of water
2 1/2 cups of sugar

Using a vegetable peeler, remove the peel from the lemons in long strips (reserve the lemons for another use). Using a small sharp knife, trim away the white pith from the lemon peels; discard the pith. Place the lemon peels in a 2-quart pitcher. Pour the vodka over the peels and cover with plastic wrap. Steep the lemon peels in the vodka for 4 days at room temperature.

Stir the water and sugar in a large saucepan over medium heat until the sugar dissolves, about 5 minutes. Cool completely. Pour the sugar syrup over the vodka mixture. Cover and let stand at room temperature overnight. Strain the limoncello through a mesh strainer. Discard the peels. Transfer the limoncello to bottles. Seal the bottles and refrigerate until cold, at least 4 hours and up to 1 month. (Pssst… it’ll keep longer than a month if you can manage not to drink it. Yes that’s a dare!)